Thursday, October 31, 2013

Raspberry Pi in Car

Device to Cloud, Hands-On. Part 7: The Pi in the Car
This video show Raspberry Pi that lives in car and some other nice things that a latest-model vehicle (from Audi in this case) can do with built-in online data services, such as getting much more frequent traffic data updates that give you the all-important 10 minute information edge over radio-signal based services when avoiding the just-formed traffic jam ahead.

Source: Channel 9 - Device to Cloud, Hands-On. Part 7: The Pi in the Car

Tuesday, October 29, 2013

7" LCD Display with Composite input for Raspberry Pi

7" LCD Display with Composite input for Raspberry Pi
Yes, this is an adorable miniature monitor! The visible display measures only 7" diagonal, the TFT comes with a NTSC/PAL driver board.The display is very easy to use - simply connect 4.5-15VDC to the red and black wires, then connect a composite video source to the yellow and black wire. Voila, a television display! There's a little button to adjust the LED backlight brightness (5 levels) - there is no other adjustment available but we found that the color and contrast look great right out of the box.To demonstrate it, photos were taken with the display connected to a Raspberry Pi, but it will also work connected to any analog composite-video output such as a YBox or Propeller w/Video out. It will not work with a device that only outputs VGA, HDMI or any other digital video signal.A 12V power adapter is included, even though the display specifies 12VDC it works from 5V to 12V DC without problems.Please note, these miniature displays are very delicate and require care to avoid ripping the delicate flex connector. These are best used by electronics geeks who have experience and are comfortable working with delicate electronic components. WE CANNOT REPLACE DAMAGED DISPLAYS if you are not careful and rip the flex connector!


  • Power with 9-12VDC only.320mA power draw at 12V, 450mA at 9VDC.Visible display dimensions: 154.5mm x 86.8mm.Selectable 16:9 or 4:3 ratio via menu.Resolution: 480 x RGB x 234.Brightness: 250cd/m2.Contrast: 400:1.Display plastic case dimensions: 172mm x 114.28mm.Weight (excluding power cable): 383.2g.

Monday, October 28, 2013

Linus Torvalds Interviewed on Stage at LinuxCon + CloudOpen Europe 2013

Linus Torvalds Interviewed on Stage at LinuxCon + CloudOpen Europe 2013
From LinuxCon + CloudOpen Europe 2013 in Edinburgh, UK. Dirk Hohndel and Linus Torvalds discuss what's next for Linux and the Linux kernel.

Friday, October 25, 2013

Raspberry Pi compatible Peripherals list

This link to elinux.org list Verified Peripherals compatible Raspberry Pi.


Change command prompt in LXTerminal

To change command prompt in LXTerminal, enter the command:


pi@raspberrypi ~ $ PS1="new command prompt"

example:
Change command prompt in LXTerminal

Thursday, October 24, 2013

Remote login Raspberry Pi SSH server

Before you can login Raspberry Pi remotely, make sure you have setup and enable SSH server in your Raspberry Pi, and to know the IP address of your Raspberry Pi.

To login Raspberry Pi from a remote PC running Linux, enter the command in Terminal:

$ ssh <ip address> -l pi

or login with X-windows with -X option:

$ ssh -X <ip address> -l pi

example:
$ ssh 192.168.1.108 -l pi
$ ssh -X 192.168.1.108 -l pi

Setup Raspberry Pi SSH server

SSH Server should be enabled in default Raspberry Pi first time boot up and installation. If not, you can enable SSH server in "Raspberry Pi Software Configuration Tool", enter the command in LXTerminal:

$ sudo raspi-config

- Select Advanced Options

- Select SSH

- Enable SSH server

- OK

- Finish


Related:
- Remote login Raspberry Pi SSH server from Linux.
- Remote login Raspberry Pi SSH server from Windows.

Check my IP address of Raspberry Pi

To check my IP address of Raspberry Pi, we can enter ifconfig command in LXTerminal.

pi@raspberrypi ~ $ ifconfig
eth0      Link encap:Ethernet  HWaddr b8:27:eb:b2:d9:ac  
          inet addr:192.168.1.108  Bcast:192.168.1.255  Mask:255.255.255.0
          UP BROADCAST RUNNING MULTICAST  MTU:1500  Metric:1
          RX packets:50 errors:0 dropped:0 overruns:0 frame:0
          TX packets:35 errors:0 dropped:0 overruns:0 carrier:0
          collisions:0 txqueuelen:1000 
          RX bytes:5456 (5.3 KiB)  TX bytes:3770 (3.6 KiB)

lo        Link encap:Local Loopback  
          inet addr:127.0.0.1  Mask:255.0.0.0
          UP LOOPBACK RUNNING  MTU:16436  Metric:1
          RX packets:0 errors:0 dropped:0 overruns:0 frame:0
          TX packets:0 errors:0 dropped:0 overruns:0 carrier:0
          collisions:0 txqueuelen:0 
          RX bytes:0 (0.0 B)  TX bytes:0 (0.0 B)


ifconfig

ifconfig (short for interface configuration) is a system administration utility in Unix-like operating systems to configure, control, and query TCP/IP network interface parameters from a command line interface (CLI) or in system configuration scripts. Ifconfig originally appeared in 4.2BSD as part of the BSD TCP/IP suite.
reference ~ Wikipedia

Tuesday, October 22, 2013

Adafruit WebIDE, the easiest way to develop code on your Raspberry Pi or BeagleBone

The Adafruit WebIDE is by far the easiest way to run code on your Raspberry Pi or BeagleBone. Just connect your Pi or BeagleBone to your local network, and log on to the WebIDE in your web browser to edit Python, Ruby, JavaScript, or anything and easily send it over to your Pi. The WebiDE includes a terminal, so you can easily send various commands to your Pi right from the browser. Also, your code will be versioned in a local git repository, and pushed remotely out to bitbucket so you can access it from anywhere, and any time.


Visit: Adafruit WebIDE

Build Qt 5 for Raspberry Pi on Raspberry Pi


This tutorial from Qt Project guide you how to Native Build of Qt 5 on a Raspberry Pi.

There are many tutorials online for building Qt5 on the Raspberry Pi, but all or most of those tutorials are for using a desktop machine to cross compile the binaries for the Raspberry Pi. You will not be able to run qmake and make on the Raspberry Pi itself if you cross compile. This tutorial is meant to show you how to natively compile Qt 5 on the Raspberry Pi so that you can use qmake and make on the Raspberry Pi itself without cross compiling or relying on an external desktop...

Caution: As stated in the document, the building process run on a Raspberry Pi overclocked running at 900 MHz, it took 38 hours to compile and the temperature was a steady 51 C – 54 C...!!!

Get Raspberry Pi system temperature with vcgencmd

To get Get Raspberry Pi system temperature, enter the command in Terminal:

$ vcgencmd measure_temp

$ vcgencmd measure_temp
Related: How to read Pi's system temperature in Java, using ProcessBuilder with command of "vcgencmd measure_temp".

Install GIMP on Raspberry Pi

GIMP (GNU Image Manipulation Program) is a very common and useful image editor in Linux. To install GIMP on Raspberry Pi, enter the command in terminal.

$ sudo apt-get install gimp

After installed, the item "GNU Image Manipulation Program" will be added in Graphics of Start Menu.


Install Flash Player replacement, Gnash, on Raspberry pi

To play Flash in Raspberry Pi browser, such as Midori, you can install Gnash.

Enter command in Terminal:
$ sudo apt-get install gnash
$ sudo apt-get install browser-plugin-gnash

Close and re-open your browser.

remark: but...the performance is so...

without Gnash

with Gnash

Check SD Card speed in Raspberry Pi

To check the read/write speed of SD Card using in raspberry Pi, we can use the command dd.

- Check write speed:
$ sync; time dd if=/dev/zero of=~/test.tmp bs=500K count=1024; time sync

- Check read speed:
$ dd if=~/test.tmp of=/dev/null bs=500K count=1024

- Remove ~/test.tmp after tested:
$ rm ~/test.tmp

Reference: http://elinux.org/RPi_SD_cards#Terminal_Commands

Check SD Card speed in Raspberry Pi

Print system information for Raspberry Pi with uname command

Linux command uname print system information.


Usage: uname [OPTION]...
Print certain system information.  With no OPTION, same as -s.

  -a, --all                print all information, in the following order,
                             except omit -p and -i if unknown:
  -s, --kernel-name        print the kernel name
  -n, --nodename           print the network node hostname
  -r, --kernel-release     print the kernel release
  -v, --kernel-version     print the kernel version
  -m, --machine            print the machine hardware name
  -p, --processor          print the processor type or "unknown"
  -i, --hardware-platform  print the hardware platform or "unknown"
  -o, --operating-system   print the operating system
      --help     display this help and exit
      --version  output version information and exit

uname: print system information

"hard float ABI" vs "soft float ABI"

ABI stands for application binary interface. The term has slightly different meanings in different contexts but in this context it refers to the set of rules used to set up registers and the stack when calling and returning from functions and other details that are required for binaries to be compatible with each other.

The "soft float" ABI passes floating point parameters in integer registers while the "hard float ABI" passes them in vfp (floating point) registers. The two ABIs are not compatible because they use different registers. It is possible to use hardware floating point with the soft-float ABI but doing so means that whenever a floating point value is passed to or returned from a function it must be transferred to an integer register incurring a performance penalty.

source: RaspbianFAQ - What do you mean by "soft float ABI" and "hard float ABI"?

Get CPU info for raspberry Pi

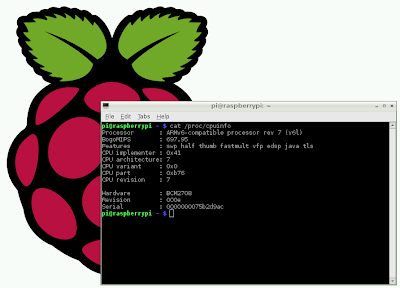
To print CPU info for Raspberry Pi board, enter the command in LXTerminal:
$ cat /proc/cpuinfo

The output will be:
pi@raspberrypi ~ $ cat /proc/cpuinfo
Processor : ARMv6-compatible processor rev 7 (v6l)
BogoMIPS : 697.95
Features : swp half thumb fastmult vfp edsp java tls 
CPU implementer : 0x41
CPU architecture: 7
CPU variant : 0x0
CPU part : 0xb76
CPU revision : 7

Hardware : BCM2708
Revision : 000e
Serial  : 0000000075b2d9ac

print CPU info for Raspberry Pi

Monday, October 21, 2013

Print system info for Raspberry Pi

To print system info of Raspberry Pi, we can use the shell script "system-info.sh" download here:
http://ryan.sayr.eu/~ryan/system-info/

Before run, you have to modify its permission to be executable.

Print system info for Raspberry Pi
system-info.sh:
#!/bin/bash

VERSION="0.5.3"
# raspberry-pi system information script
# One script that can tell you the RAM config, serial number, SD card size, 
# temperature, and codec entitlements. Work-in-progress!
# Requires bc to for quick calculation. (apt-get install bc on debian)

# check if run as a normal user - if so, exit.
if [[ $(/usr/bin/id -u) -ne 0 ]]; then
    echo "$0 not running as root!"
    exit
fi

# calculate the memory allocated based upon the GPU / system split
# in config.txt (gpu_mem=64) - use vcgencmd because text file contents may be
# different than actual memory split allocation!
sysmem=`/opt/vc/bin/vcgencmd get_mem arm  | sed 's/[A-Za-z]*//g' | cut -c 2-`
gpumem=`/opt/vc/bin/vcgencmd get_mem gpu  | sed 's/[A-Za-z]*//g' | cut -c 2-`
totalmem=`expr $sysmem + $gpumem`

# Model A shouldn't have the smsc95xx installed! Return 1 if it's a modelB
modelB=`lsusb -t | grep -c smsc95xx`
rpiSerialNum=`grep Serial /proc/cpuinfo | cut -d " " -f 2`

echo "*** system-info for raspberry-pi $VERSION ***************************************"
if [ "$modelB" = "1" ]
then
  echo "Model B serial $rpiSerialNum detected with $totalmem MB ($sysmem Sys/$gpumem GPU)"
else
  echo "Model A serial $rpiSerialNum detected with $totalmem MB installed ($sysmem sys / $gpumem gpu split)"
fi

# Raw SD card capacity does not translate to usable space! May need resizing!
fdiskOutput=`fdisk -l /dev/mmcblk0 | grep GB | cut -d \  -f 3,4`
echo "SD card raw capacity: ${fdiskOutput:0:-1}"
echo " "
echo -n "Firmware version: "
/opt/vc/bin/vcgencmd version | grep -v Broadcom
echo " "
tm=`/opt/vc/bin/vcgencmd measure_temp`
tc=`echo $tm| cut -d '=' -f2 | sed 's/..$//'`
tf=$(echo "scale=1; (1.8*$tc)+32" | bc)
echo -e "temp:\t $tf'F ($tc'C)"
echo " "
#echo -e "temp:\t $(/opt/vc/bin/vcgencmd measure_temp)" ;
for src in arm core v3d uart emmc pixel hdmi ; do echo -e "$src:\t $(/opt/vc/bin/vcgencmd measure_clock $src)" ; done
echo " "
for id in core sdram_c sdram_p ; do echo -e "$id: $(/opt/vc/bin/vcgencmd measure_volts $id)" ; done
echo " "
for codec in MPG2 WVC1 ; do echo -e "$codec:\t $(/opt/vc/bin/vcgencmd codec_enabled $codec)" ; done


Capture screen in Raspberry Pi with Scrot

Scrot is a minimalistic command line screen capturing application. It allows substantial degree of flexibility by specifying parameters on command line, including the ability to invoke a third-party utility to manipulate the resulting screenshot.


- Install Scrot on Raspberry Pi:

Open Terminal:
start > accessories > LXTerminal

Enter the command in LXTerminal
$ sudo apt-get install scrot

- To capture screen:
Enter the command in LXTerminal
$ scrot

- Display help message:
$ scrot -h

Reference: http://en.wikipedia.org/wiki/Scrot

Raspberry Pi screen captured with Scrot

My Raspberry Pi


Sunday, October 20, 2013

Raspberry Pi run with 1.8" TFT LCD display

Raspberry Pi run with a 1.8" TFT LCD. know more: http://www.whence.com/rpi/

Raspberry Pi boots with 1.8" TFT LCD console
Raspberry Pi boots with a SainSmart 1.8" ST7735R TFT LCD as console. Demo of st7735fb kernel driver with fbcon.

Adafruit 1.8" TFT LCD on Raspberry Pi runs mplayer, fbterm, X
Adafruit 1.8" TFT LCD display module on a Raspberry Pi as a kernel framebuffer device. Demo of various framebuffer applications: mplayer, fbterm, fbdev-test, X desktop. Project.

Saturday, October 19, 2013

Qt on Raspberry Pi


This presentation introduces the Raspberry Pi, a low cost computing platform. It discusses how it can be used as a development platform for Qt and describes the current status of Qt 4 and Qt 5 on Raspberry Pi.

Start with an overview of what the Raspberry Pi is, the non-profit foundation behind it’s development, and a description of the hardware and software it supports.

Then look at Qt on the Raspberry Pi, including the QtonPi Linux distribution and device program. Also look at the state of Qt versions 4 and 5 on the Raspberry Pi platform.

Recorded at the Qt Developer Days in Berlin in 2012.

Slides available at http://qtconference.kdab.com/node/25


Friday, October 18, 2013

Infrared camera on Raspberry Pi

Pi NoIR infrared time-lapse: lawn
A first attempt at nighttime time-lapse photography with the new Raspberry Pi camera, Pi NoIR, and infrared illumination.


Read about it: http://www.raspberrypi.org/archives/5089


Thursday, October 17, 2013

mini-touch-screen-display for Raspberry Pi

I'm looking for mini-touch-screen-display for Raspberry Pi, any body can advise?


I found demo videos from Youtube about it:

from the Youtube video owner: 7" raspberry pi touchscreen tft hdmi 720p - I bought it on ebay from chinatobby2011 for only 45 EUR. The touch panel is called AT070TN92 V.5 and the HDMI AD Board is called VS-TY2662-V1 or PCB800099. I have made a screenshot from the ebay auction: goo.gl / hd9Nt The auction title is: "HDMI+VGA+2AV Driver board+7inch 800*480 AT070TN92 V.5 Lcd with touch panel"

raspberry pi resistive touchscreen with 7" tft over hdmi


The owner's another video to callibrate it, but it looks very well. I had to recompile the kernel of raspbian release 3.2.27. Raspbian already has an eGalax usbtouchscreen.ko driver module: http://goo.gl/n69Q1 which works with my 45 EUR touch panel (AT070TN92 V.5) + HDMI AD Board (PCB800099)


Wednesday, October 16, 2013

How to set up your Raspberry Pi with the New Out of Box Software


How to set up your Raspberry Pi with NOOBS- The New and Exciting Way! No... really... If you found imaging an SD card a bit of a chore, or find it daunting to start out with Pi, then the 'new out of box software' is for you!

Blog post tutorial: http://geekgurldiaries.blogspot.co.uk/2013/06/how-to-set-up-your-raspberry-pi-new-and.html

Sunday, October 13, 2013

JavaFX on Raspberry Pi

Intro to JavaFX on Raspberry Pi - Part I
Bruno Borges (@brunoborges on Twitter) introduced JavaFX on Raspberry Pi at Java Embedded Challenge for Raspberry during JavaOne 2013.


Intro to JavaFX on Raspberry Pi - Part II
Bruno Borges (@brunoborges on Twitter) introduced JavaFX on Raspberry Pi at Java Embedded Challenge for Raspberry during JavaOne 2013.