Showing posts with label example code.C and Cpp. Show all posts

Monday, November 29, 2021

Simple exercise to control GPIO on Raspberry Pi, C and Python

Simple exercise to control GPIO on Raspberry Pi, tested on Raspberry Pi Zero 2 W running "Raspbian GNU/Linux 11 (bullseye)".

blink.c, in C language:
#include <stdio.h>
#include <pigpio.h>

#define led 17

int main(void){
	printf("- IO Test on\n");
	printf("- Raspberry Pi Zero 2 W\n");
	
	gpioInitialise();
	gpioSetMode(led, PI_OUTPUT);
	
	while(1){
		gpioWrite(led, 1);
		time_sleep(1);
		gpioWrite(led, 0);
		time_sleep(1);
	}

}

To compile it link to pigpio library:
$ gcc blink.c -o blink -lpigpio

To run it with sudo:
$ sudo ./blink


py_LED.py, in Python:
from gpiozero import LED
from time import sleep

led = LED(17)

while True:
    led.on()
    sleep(1)
    led.off()
    sleep(1)


Sunday, February 7, 2016

c language to get MAC address, run on Raspberry Pi/Raspbian Jessie


c language to get MAC address, run on Raspberry Pi/Raspbian Jessie:


reference: http://www.geekpage.jp/en/programming/linux-network/get-macaddr.php

cMAC.c
#include <stdio.h>
#include <string.h>
#include <sys/types.h>
#include <sys/socket.h>
#include <sys/ioctl.h>
#include <netinet/in.h>
#include <net/if.h>

int
main()
{
    int fd;
    struct ifreq ifr;
    
    fd = socket(AF_INET, SOCK_DGRAM, 0);
    
    ifr.ifr_addr.sa_family = AF_INET;
    strncpy(ifr.ifr_name, "eth0", IFNAMSIZ-1);
    
    ioctl(fd, SIOCGIFHWADDR, &ifr);
    close(fd);
    
    printf("%.2x:%.2x:%.2x:%.2x:%.2x:%.2x\n",
        (unsigned char)ifr.ifr_hwaddr.sa_data[0],
        (unsigned char)ifr.ifr_hwaddr.sa_data[1],
        (unsigned char)ifr.ifr_hwaddr.sa_data[2],
        (unsigned char)ifr.ifr_hwaddr.sa_data[3],
        (unsigned char)ifr.ifr_hwaddr.sa_data[4],
        (unsigned char)ifr.ifr_hwaddr.sa_data[5]);
        
    return 0;
}


Related:
Java to list Network Interface Parameters (include MAC address)
Python to get MAC address using uuid

Saturday, February 6, 2016

C example to getting IP address from a network interface, run on Raspberry Pi/Raspbian Jessie


C example to getting IP address from a network interface, run on Raspberry Pi/Raspbian Jessie.


Reference: http://www.geekpage.jp/en/programming/linux-network/get-ipaddr.php

cIP.c
#include <stdio.h>

#include <string.h> /* for strncpy */

#include <sys/types.h>
#include <sys/socket.h>
#include <sys/ioctl.h>
#include <netinet/in.h>
#include <net/if.h>

/*
 *  Getting IP address from a network interface
 *  reference: http://www.geekpage.jp/en/programming/linux-network/get-ipaddr.php 
 * 
 */
 
int main()
{
    int fd;
    struct ifreq ifr;

    fd = socket(AF_INET, SOCK_DGRAM, 0);
    
    /* I want to get an IPv4 IP address */
    ifr.ifr_addr.sa_family = AF_INET;
    
    /* I want IP address attached to "eth0" */
    strncpy(ifr.ifr_name, "eth0", IFNAMSIZ-1);
    
    ioctl(fd, SIOCGIFADDR, &ifr);
    
    close(fd);
    
    /* display result */
    printf("%s\n", inet_ntoa(((struct sockaddr_in *)&ifr.ifr_addr)->sin_addr));
    
    return 0;
}


Related:
Java code to listing Network Interface Addresses, run on Raspberry Pi/Raspbian Jessie
Python code to find my IP address, run on Raspberry Pi/Raspbian Jessie

Saturday, October 17, 2015

Remote develop C/C++ program from Windows 10, run on Raspberry Pi, using NetBeans IDE

This post show how to develop C/C++ program on Netbeans IDE run on Windows 10, set up remote host on raspberry Pi. Such that you can run the program on Raspberry Pi remotely.


Local client host (the PC you used to develop):
Windows 10
Netbeans IDE 8.0.2 with C/C++ plugins (https://netbeans.org/community/releases/80/cpp-setup-instructions.html#downloading)
C/C++ compiler: 32-bit MinGW(https://netbeans.org/community/releases/80/cpp-setup-instructions.html#mingw)

Remote host (The target remote platform to run the program):
Raspberry Pi 2
Raspbian Jessie (2015-09-24)

Follow the steps in the video:


Test code, C++:
#include <iostream>

using namespace std;

int main(int argc, char** argv) {

    std::cout << "Hello World!\n";
    
#ifdef __linux__
    std::cout << "__linux__\n";
#elif defined(__unix__)
    std::cout << "__unix__\n";
#elif defined(_WIN64)
    std::cout << "Windows 64\n";
#elif defined(_WIN32)
    std::cout << "Windows 32\n";
#endif

#if __WORDSIZE == 64
    std::cout << "64 bit\n";
#else
    std::cout << "32 bit\n";
#endif

    return 0;
}

Reference:
https://netbeans.org/kb/docs/cnd/remote-modes.html
https://netbeans.org/kb/docs/cnd/remotedev-tutorial.html#setup

Related:
Remote run JavaFX on Raspbian Jessie, from Netbeans/Windows 10


Wednesday, February 26, 2014

C programming exercise: copy file

The following code copy file using C language, run in Raspberry Pi.

copy file using C

#include <fcntl.h>
#include <stdio.h>

int main(int argc, char *argv[]){
    
    int srcFileDesc;    //file descriptor of source file
    int destFileDesc;   //file descriptor of output file
    ssize_t numberOfRead;
    int BUFFER_SIZE = 1024;
    char buffer[BUFFER_SIZE];
    
    char *SRC_FILE ="test";
    char *DEST_FILE ="new_test";
    
    printf("copyfile:\n");
    printf("Copy file %s to %s\n", SRC_FILE, DEST_FILE);
    
    printf("Open file: %s\n", SRC_FILE);
    srcFileDesc = open("test", O_RDONLY);
    if(srcFileDesc != -1){
        
        printf("Create output file: %s\n", DEST_FILE);
        destFileDesc = open(DEST_FILE,
            O_CREAT|O_WRONLY|O_TRUNC,
            S_IRUSR|S_IWUSR|S_IRGRP|S_IWGRP|S_IROTH|S_IWOTH);
        if(destFileDesc != -1){
            
            while((numberOfRead=read(srcFileDesc, buffer, BUFSIZ)) > 0){
                if(write(destFileDesc, buffer, numberOfRead) != numberOfRead){
                    printf("Error in copying...!\n");
                }
            }
            
            if(numberOfRead == -1){
                printf("Something wrong...!\n");
            }
            
            if (close(destFileDesc) != -1){
                printf("Close destination file: %s\n", DEST_FILE);
            }else{
                printf("Error in Close destination file: %s\n", DEST_FILE);
            }
            
        }else{
            printf("Error in Create output file: %s\n", DEST_FILE);
        }
        
        if (close(srcFileDesc) != -1){
            printf("Close file: %s\n", SRC_FILE);
        }else{
            printf("Error in Close file: %s\n", SRC_FILE);
        }
    }else{
        printf("Cannot open file: %s\n", SRC_FILE);
    }
}

Tuesday, December 10, 2013

GTK+ exercise: GtkBox - A container box

Example of using GtkBox.
GtkBox
Example of using GtkBox
helloGtkBox.c
#include <gtk/gtk.h>

int main(int argc, char *argv[])
{
    GtkWidget *window;
    GtkWidget *label1, *label2, *label3;
    GtkWidget *box;
    
    gtk_init(&argc, &argv);
    window = gtk_window_new(GTK_WINDOW_TOPLEVEL);
    
    gtk_window_set_title(GTK_WINDOW(window), 
        "Hello Raspberry Pi - GTK+ exercise"); 
        
    //terminate the application when the GtkWindow is destroyed
    g_signal_connect (window, "destroy", 
        G_CALLBACK(gtk_main_quit), NULL);
    
    label1 = gtk_label_new("Label 1");
    label2 = gtk_label_new("Label 2");
    label3 = gtk_label_new("Label 3");
    
    box = gtk_box_new(GTK_ORIENTATION_HORIZONTAL, 10);
    
    gtk_box_pack_start(GTK_BOX(box), label1, TRUE, FALSE, 5);
    gtk_box_pack_start(GTK_BOX(box), label2, TRUE, FALSE, 5);
    gtk_box_pack_start(GTK_BOX(box), label3, TRUE, FALSE, 5);
    
    gtk_container_add(GTK_CONTAINER(window), box);
    gtk_widget_show_all(window);
    
    gtk_main();
    
    return 0;
}


Friday, December 6, 2013

Hello GTK+ 2.0

Modified Hello GTK+
Last post show how to Install gtk+ on Raspberry Pi and with a very simple "Hello World" to GTK+. It's modified version of the Hello World:

  • To terminal terminate the application when the GtkWindow is destroyed, connect "destroy" to gtk_main_quit callback using g_signal_connect()
  • Add a GtkWidget of button to print "Hello GTK+\n" on screen by calling g_print().
Example code:
#include <gtk/gtk.h>

static void hello(GtkWidget *widget, gpointer   data)
{
 g_print("Hello GTK+\n");
}

int main(int argc, char *argv[])
{
 GtkWidget *window;
 GtkWidget *buttonHello;
 
 gtk_init(&argc, &argv);
 window = gtk_window_new(GTK_WINDOW_TOPLEVEL);
 
 buttonHello = gtk_button_new_with_label("Hello GTK+");
 g_signal_connect(buttonHello, "clicked", 
  G_CALLBACK(hello), NULL);
 
 //terminate the application when the GtkWindow is destroyed
 g_signal_connect (window, "destroy", 
  G_CALLBACK(gtk_main_quit), NULL);
  
 gtk_container_add(GTK_CONTAINER (window), buttonHello);
 gtk_widget_show(buttonHello);
 gtk_widget_show(window);

 gtk_main();

 return(0);
}


Compile and run the program as describe in last post.

Install gtk+ 2.0 on Raspberry Pi and "Hello World" to GTK+

This post show how to install gtk+2.0 on Raspberry Pi, and create our first "Hello World" of GTK+ on Raspberry Pi.

GTK+ program on Raspberry Pi
To install gtk+ 2.0, enter the command:
$ sudo apt-get install libgtk2.0-dev

After installed, create our first GTK+ program, name it hellogtk.c
#include <gtk/gtk.h>

int main(int argc, char *argv[])
{
 GtkWidget *window;
 
 gtk_init(&argc, &argv);
 window = gtk_window_new(GTK_WINDOW_TOPLEVEL);
 gtk_widget_show(window);

 gtk_main();

 return(0);
}

Enter the command to compile hellogtk.c:
gcc hellogtk.c -o hellogtk `pkg-config --cflags --libs gtk+-2.0`

Run the generated program:
$ ./hellogtk

hellogtk
./hellogtk


Next:
- Modified "Hello GTK+" to terminal application when the GtkWindow is destroyed, and add a button to print something.

Related:
Install GTK+ 3.0 on Raspberry Pi

Sunday, December 1, 2013

C exercise: run host command and get result with popen()

The function popen() execute command and returning a pointer to the stream which can be used to read the result.
run host command and get result with popen()

#include <stdio.h>
#include <stdlib.h>

int main(){
 FILE *result;
 extern FILE *popen();
 char buff[512];
 
 result = popen("df -h", "r");
 if(result){
  int linenumber = 0;
  while(fgets(buff, sizeof(buff), result)!=NULL){
   printf("%d: %s", linenumber, buff);
   linenumber++;
  }
  pclose(result);
  exit(0);
 }else{
  printf("error! ");
  exit(1);
 }
}


Related:
- Run host command with system() without result returned

C exercise: run host command with system()

To run host command in C program, call system() of stdlib.

run host command with system()

#include <stdio.h>
#include <stdlib.h>

int main(){
 system("df -h");
 return 0;
}


Related:
- Run host command and get result with popen()

Saturday, November 23, 2013

Control the on-board LED using C language

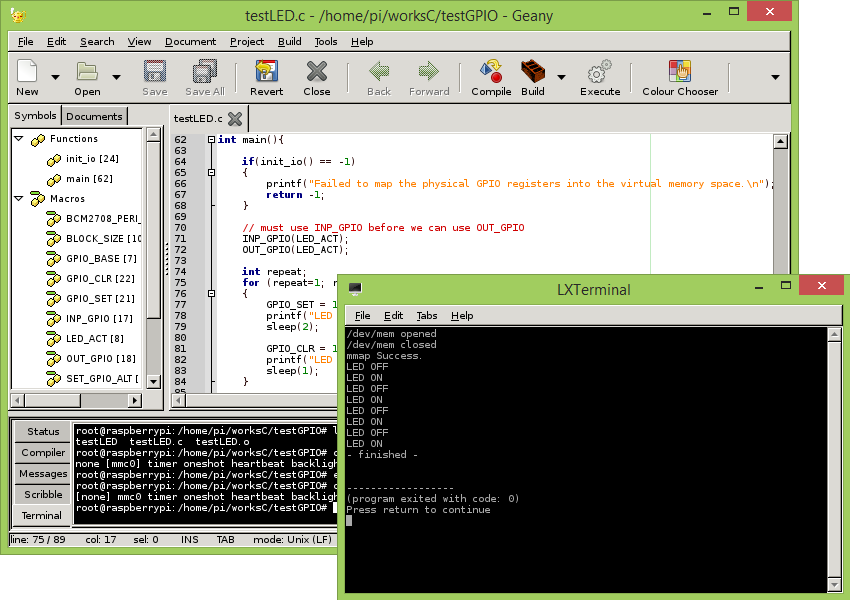
Last post show how to control Raspberry Pi on-board LED OK or ACT in command line. This post show the code to control the LED using C language, it have the same result of the exercise using Python.

Control the on-board LED using C language
Control the Raspberry Pi on-board LED using C language
testLED.c
#include <stdio.h>
#include <fcntl.h>
#include <sys/mman.h>
#include <unistd.h>

#define BCM2708_PERI_BASE 0x20000000
#define GPIO_BASE   (BCM2708_PERI_BASE + 0x200000) /* GPIO controller */
#define LED_ACT    16

#define BLOCK_SIZE (4*1024)

int mem_fd;
void *gpio_map;
volatile unsigned *gpio;

// GPIO setup macros. Always use INP_GPIO(x) before using OUT_GPIO(x) or SET_GPIO_ALT(x,y)
#define INP_GPIO(g) *(gpio+((g)/10)) &= ~(7<<(((g)%10)*3))
#define OUT_GPIO(g) *(gpio+((g)/10)) |=  (1<<(((g)%10)*3))
#define SET_GPIO_ALT(g,a) *(gpio+(((g)/10))) |= (((a)<=3?(a)+4:(a)==4?3:2)<<(((g)%10)*3))

#define GPIO_SET *(gpio+7)  // sets   bits which are 1 ignores bits which are 0
#define GPIO_CLR *(gpio+10) // clears bits which are 1 ignores bits which are 0
 
int init_io()
{
 /* open /dev/mem */
 if ((mem_fd = open("/dev/mem", O_RDWR|O_SYNC) ) < 0) {
  printf("can't open /dev/mem \n");
  return(-1);
 }else{
  printf("/dev/mem opened\n");
  
  /* mmap GPIO */
  gpio_map = mmap(
   NULL,             //Any adddress in our space will do
   BLOCK_SIZE,       //Map length
   PROT_READ|PROT_WRITE,// Enable reading & writting to mapped memory
   MAP_SHARED,       //Shared with other processes
   mem_fd,           //File to map
   GPIO_BASE         //Offset to GPIO peripheral 
  );
  
  close(mem_fd);
  printf("/dev/mem closed\n");
  
  if (gpio_map == MAP_FAILED) {
   printf("mmap error %d\n", (int)gpio_map);//errno also set!
   return(-1);
  }else{
   printf("mmap Success.\n");
  }
  
 }
 
 // Always use volatile pointer!
   gpio = (volatile unsigned *)gpio_map;

   return 0;
}


int main(){
 
 if(init_io() == -1) 
 {
  printf("Failed to map the physical GPIO registers into the virtual memory space.\n");
  return -1;
 }
 
 // must use INP_GPIO before we can use OUT_GPIO
 INP_GPIO(LED_ACT); 
    OUT_GPIO(LED_ACT);
 
 int repeat;
 for (repeat=1; repeat<5; repeat++)
 {
  GPIO_SET = 1 << LED_ACT;
  printf("LED OFF\n");
  sleep(2);

  GPIO_CLR = 1 << LED_ACT;
  printf("LED ON\n");
  sleep(1);
 }
 
 printf("- finished -\n");
 return 0;
}


remark:
- You have to login as root to read /dev/mem and control the GPIO. Read the post "Set password of root".
- Disable the LED trigger from mmc0, read the post "Control the on-board LED on Raspberry Pi".

Reference:
- elinux.org: RPi Low-level peripherals

Thursday, November 14, 2013

Hello World using C on Raspberry Pi

The post show how to use the editor nano to create a C's source code of "Hello World", then compile with gcc, and run it. All tools, nano and gcc, are come with Raspbian.

- Create a text file helloworld.c with nano, Ctrl-X to Exit and save the file.
$ nano helloworld.c

- Enter the code:
#include <stdio.h>

int main() {
    printf("Hello World\n");
    return 0;
}

- Compile the code and set output as helloworld
$ gcc -o helloworld helloworld.c

- Run the generated helloworld
$ ./helloworld

The words "Hello World" will be printed.