Sunday, June 21, 2020

Install Arduino IDE/Seeed SAMD Boards on Raspberry Pi OS, to program Wio Terminal on RPi

Steps to install Arduino IDE on Raspberry Pi 4/Raspberry Pi OS (32-bit), then add Seeed SAMD Boards; to program Seeed Wio Terminal on Raspberry Pi.


Install Arduino IDE (Linux ARM 32 bits) on Raspberry Pi/Raspberry Pi OS


Download Arduino IDE for Linux ARM 32 bits
https://www.arduino.cc/en/Main/Software

Basically follow the official guide to Install the Arduino Software (IDE) on Linux, but install by running ./install.sh with sudo.

$ sudo ./install.sh

After installed, I tested to program Wio Terminal without problem. No extra steps is needed to set serial port permission.


Install Seeed SAMD Boards to Arduino IDE, for Wio Terminal development


Open your Arduino IDE, click on File > Preferences,
and copy below url to Additional Boards Manager URLs:
https://files.seeedstudio.com/arduino/package_seeeduino_boards_index.json

Tools > Board > Board Manager,
Search Wio Terminal, install Seeed SAMD Boards.

reference: Get Started with Wio Terminal, more informative details and examples.

My first exercise for Wio terminal, simple detect button press and draw something on display:
#include <SPI.h>
#include <TFT_eSPI.h>

TFT_eSPI tft = TFT_eSPI();

int ptX = 50;
int ptY = 50;

/*  Some basic pre-defined example colours(16-bit) including in the LCD library:
#define TFT_BLACK       0x0000      //   0,   0,   0
#define TFT_NAVY        0x000F      //   0,   0, 128
#define TFT_DARKGREEN   0x03E0      //   0, 128,   0
#define TFT_DARKCYAN    0x03EF      //   0, 128, 128
#define TFT_MAROON      0x7800      // 128,   0,   0
#define TFT_PURPLE      0x780F      // 128,   0, 128
#define TFT_OLIVE       0x7BE0      // 128, 128,   0
#define TFT_LIGHTGREY   0xC618      // 192, 192, 192
#define TFT_DARKGREY    0x7BEF      // 128, 128, 128
#define TFT_BLUE        0x001F      //   0,   0, 255
#define TFT_GREEN       0x07E0      //   0, 255,   0
#define TFT_CYAN        0x07FF      //   0, 255, 255
#define TFT_RED         0xF800      // 255,   0,   0
#define TFT_MAGENTA     0xF81F      /* 255,   0, 255
#define TFT_YELLOW      0xFFE0      /* 255, 255,   0
#define TFT_WHITE       0xFFFF      /* 255, 255, 255
#define TFT_ORANGE      0xFDA0      /* 255, 180,   0
#define TFT_GREENYELLOW 0xB7E0      /* 180, 255,   0
ref: https://wiki.seeedstudio.com/Wio-Terminal-LCD-Basic/
*/

/*  basic graphical functions of the TFT LCD library on Wio Terminal.
    ref: https://wiki.seeedstudio.com/Wio-Terminal-LCD-Graphics/
drawPixel(int32_t x, int32_t y, uint32_t color);
drawLine(int32_t x0, int32_t y0, int32_t x1, int32_t y1, uint32_t color);
drawFastHLine(int32_t x, int32_t y, int32_t w, uint32_t color); //Horizontal line
drawFastVLine(int32_t x, int32_t y, int32_t h, uint32_t color); //Verical line
drawRect(int32_t x, int32_t y, int32_t w, int32_t h, uint32_t color);
fillRect(int32_t x, int32_t y, int32_t w, int32_t h, uint32_t color);
drawCircle(int32_t x0, int32_t y0, int32_t r, uint32_t color);
fillCircle(int32_t x0, int32_t y0, int32_t r, uint32_t color);
drawEllipse(int16_t x0, int16_t y0, int32_t rx, int32_t ry, uint16_t color);
fillEllipse(int16_t x0, int16_t y0, int32_t rx, int32_t ry, uint16_t color);
drawTriangle(int32_t x0, int32_t y0, int32_t x1, int32_t y1, int32_t x2, int32_t y2, uint32_t color);
fillTriangle(int32_t x0, int32_t y0, int32_t x1, int32_t y1, int32_t x2, int32_t y2, uint32_t color);
drawRoundRect(int32_t x, int32_t y, int32_t w, int32_t h, int32_t r, uint32_t color);
fillRoundRect(int32_t x, int32_t y, int32_t w, int32_t h, int32_t r, uint32_t color);
drawChar(int32_t x, int32_t y, uint16_t c, uint32_t color, uint32_t bg, uint8_t size)
drawString(const String& string, int32_t pptX, int32_t pptY);
fillScreen(uint32_t color);
*/

void updateLoc(String s){
  tft.drawPixel(ptX, ptY, TFT_WHITE);
  const String strLoc = s + " "+ (String)ptX + ":" + (String)ptY + "     ";
  Serial.println(strLoc);
  tft.drawString(strLoc, 100, 100);
}

void setup() {
  Serial.begin(115200);

  pinMode(WIO_KEY_A, INPUT_PULLUP);
  pinMode(WIO_KEY_B, INPUT_PULLUP);
  pinMode(WIO_KEY_C, INPUT_PULLUP);
  pinMode(WIO_5S_UP, INPUT_PULLUP);
  pinMode(WIO_5S_DOWN, INPUT_PULLUP);
  pinMode(WIO_5S_LEFT, INPUT_PULLUP);
  pinMode(WIO_5S_RIGHT, INPUT_PULLUP);
  pinMode(WIO_5S_PRESS, INPUT_PULLUP);

  tft.init();
  tft.setRotation(2);
  tft.fillScreen(TFT_LIGHTGREY);
  tft.fillRect(1, 1, 238, 318, TFT_BLACK);
  tft.fillTriangle(1, 1, 1, 11, 11, 1, TFT_BLUE);
  tft.fillTriangle(238, 318, 238, 308, 228, 318, TFT_RED);
  updateLoc("x");

}

 
void loop() {
  // put your main code here, to run repeatedly:
   if (digitalRead(WIO_5S_UP) == LOW) {
    Serial.println("5 Way Up");
    ptX++;
    updateLoc("^");
   }
   else if (digitalRead(WIO_5S_DOWN) == LOW) {
    Serial.println("5 Way Down");
    ptX--;
    updateLoc("v");
   }
   else if (digitalRead(WIO_5S_LEFT) == LOW) {
    Serial.println("5 Way Left");
    ptY--;
    updateLoc("<");
   }
   else if (digitalRead(WIO_5S_RIGHT) == LOW) {
    Serial.println("5 Way Right");
    ptY++;
    updateLoc(">");
   }
   else if (digitalRead(WIO_5S_PRESS) == LOW) {
    Serial.println("5 Way Press");
    updateLoc("@");
    tft.fillCircle(ptX, ptY, 5, TFT_ORANGE);
   }

   if (digitalRead(WIO_KEY_A) == LOW) {
    Serial.println("A Key pressed");
    ptX+=10;
    updateLoc("A");
    tft.fillCircle(ptX, ptY, 10, TFT_RED);
   }
   else if (digitalRead(WIO_KEY_B) == LOW) {
    Serial.println("B Key pressed");
    updateLoc("B");
    tft.fillCircle(ptX, ptY, 10, TFT_GREEN);
   }
   else if (digitalRead(WIO_KEY_C) == LOW) {
    Serial.println("C Key pressed");
    ptX-=10;
    updateLoc("C");
    tft.fillCircle(ptX, ptY, 10, TFT_BLUE);
   }
   delay(200);
}


to do...

This wiki introduce how to update the latest firmware for the Wireless Core Realtek RTL8720 on Wio Terminal, as well as installing all the dependent libraries for Wio Terminal to enable wireless connectivity.


Related:

Sunday, June 14, 2020

Friday, June 12, 2020

Python read Bluetooth Remote Shutter on Raspberry Pi


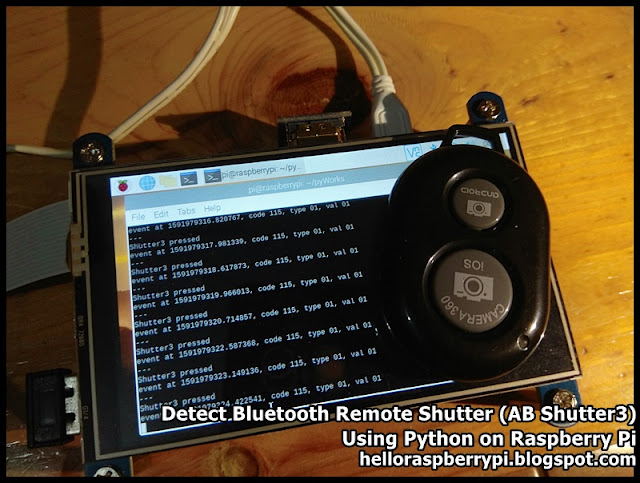
Here show how to read Bluetooth Remote Shutter using Python on Raspberry Pi. My testing unit named "AB Shutter3", with two buttons marked iOS and Android. Actually both buttons can trigger shutter of my Android phone.


Identify the input device of the remote shutter. In this step, lsinput is used to list input. Have to install input-utils.

$ sudo apt install input-utils

$ lsinput

and following commant:

$ ls /dev/input

List the input devices before and after the Bluetooth Remote Shutter to Raspberry Pi. Such that you can know the path to your BT shutter.

In my case, there are two new input devices added.
/dev/input/event5: "AB Shutter3 Consumer Control"
/dev/input/event6: "AB Shutter3 Keyboard"

But in my test, the /dev/input/event6 have NO event generated. So this exercise target to /dev/input/event5 only.

My Python exercise can run on Python 2 and 3, and evdev (https://python-evdev.readthedocs.io/en/latest/index.html) is needed. To install,

For Python3:
$ sudo pip3 install evdev

For Python2:
$ sudo pip install evdev

Python code, pyABS3.py
from evdev import InputDevice, categorize, ecodes

ABShutter3 = InputDevice('/dev/input/event5')

EV_VAL_PRESSED = 1
EV_VAL_RELEASED = 0
BTN_SHUTTER = 115

print(ABShutter3)

for event in ABShutter3.read_loop():
    if event.type == ecodes.EV_KEY:
        if event.value == EV_VAL_PRESSED:
            if event.code == BTN_SHUTTER:
                print('---')
                print('Shutter3 pressed')
                print(event)


It's found that both buttons on my shutter report the same code 115 (KEY_VOLUMEUP).


If you have such other similar device, you have to check the key code, you can use following code to list all event.

from evdev import InputDevice, categorize, ecodes

ABShutter3 = InputDevice('/dev/input/event5')

EV_VAL_PRESSED = 1
EV_VAL_RELEASED = 0
BTN_SHUTTER = 115

print(ABShutter3)

for event in ABShutter3.read_loop():
    if event.type == ecodes.EV_KEY:
        print(event)
        print(categorize(event))


Part II

After then, I borrow two more units from friends for testing. It's found that all 3 units output different combination of output.


-----------------------------------------------
Unit A:
event5: AB Shutter3 Consumer Control
event6: AB Shutter3 Keyboard

Big Button:
- event5 > KEY_VOLUMNUP

Small Button
- event5 > KEY_VOLUMNUP
-----------------------------------------------
Unit B:
event5: AB Shutter3          Consumer Control
event6: AB Shutter3          Keyboard

Big Button:
- event5 > KEY_VOLUMNUP
Small Button
- event6 > KEY_ENTER
- event5 > KEY_VOLUMNUP
-----------------------------------------------
Unit C:
event5: i Shutter Keyboard
event6: i Shutter3 Consumer Control

Big Button:
- event6 > KEY_VOLUMNUP
Small Button
- event5 > KEY_ENTER
-----------------------------------------------

Check the video:
(I capture the video on tab remotely via xrdp, so the response is slower.)


Testing Python script, pyShutter.py
# pyShutter.py
# Read Bluetooth Remote Shutter
# from /dev/input/event5 and /dev/input/event6
# filter for key down of ENTER and VOLUMNUP
#
# http://helloraspberrypi.blogspot.com/2020/06/detect-bluetooth-remote-shutter-ab.html
#
# Work on Python 3.5+
# For Reading events from multiple devices
# read https://python-evdev.readthedocs.io/en/latest/tutorial.html

from evdev import InputDevice, categorize, ecodes
import asyncio

Shutter5 = InputDevice('/dev/input/event5')
Shutter6 = InputDevice('/dev/input/event6')

EV_VAL_PRESSED = 1
EV_VAL_RELEASED = 0
KEY_ENTER = 28
KEY_VOLUMNUP = 115

print(Shutter5)
print(Shutter6)
print('=== Start ===')

async def print_events(device):
                
    async for event in device.async_read_loop():
        if event.type == ecodes.EV_KEY:
            if event.value == EV_VAL_PRESSED:
                if event.value == EV_VAL_PRESSED:
                    if event.code == KEY_ENTER:
                        print('<ENTER> Pressed')
                    elif event.code == KEY_VOLUMNUP:
                        print('<VOLUMNUP> Pressed')
                print(device.path, categorize(event), sep=': ')          
                print('---')

for device in Shutter5, Shutter6:
    asyncio.ensure_future(print_events(device))

loop = asyncio.get_event_loop()
loop.run_forever()


Python tkinter to detect key event

Python exercise to detect key event, for Python3 + tkinter run on Raspberry Pi OS

import tkinter as tk

def key_fun(event):
    print(event)
    key_press = event.keysym
    print(key_press)

command = tk.Tk()
command.bind_all('<Key>', key_fun)
command.mainloop()