It run with Python3.
import sys
from tkinter import *
import picamera
from pkg_resources import require
import time

#event callback functions
def evStartPreviewBtnPressed():
    print("Start Preview")
    camera.start_preview()

def evStopPreviewBtnPressed():
    print("Stop Preview")
    camera.stop_preview()

def evCaptureBtnPressed():
    print("Capture")
    timeStamp = time.strftime("%Y%m%d-%H%M%S")
    targetPath="/home/pi/Desktop/img_"+timeStamp+".jpg"
    print(targetPath)
    camera.capture(targetPath)

print(sys.version)
print(require('picamera'))


#Prepare camera
camera = picamera.PiCamera()


root = Tk()
root.geometry("600x360")
root.wm_title("Hello")
#root.configure(bg = "#909090")

labelSys = Label(root, text=sys.version, justify=LEFT)
labelSys.grid(row=0, columnspan=2, sticky=W)
labelPiCameraVer = Label(root, text=require('picamera'), justify=LEFT)
labelPiCameraVer.grid(row=1, columnspan=2, sticky=W)


btnStartPreview = Button(root, text="Start Preview",
                         command=evStartPreviewBtnPressed)
btnStopPreview = Button(root, text="Stop Preview",
                        command=evStopPreviewBtnPressed)
btnStartPreview.grid(row=2, column=0, sticky=W+E)
btnStopPreview.grid(row=2, column=1, sticky=W+E)

btnCapture = Button(root, text="Capture",
                    command=evCaptureBtnPressed)
btnCapture.grid(row=3, columnspan=2, sticky=W+E)


root.mainloop()

#close tasks
camera.close()
With Microsoft's Remote Desktop on Android device, it can be run remotely. The camera preview will be displayed on local screen.
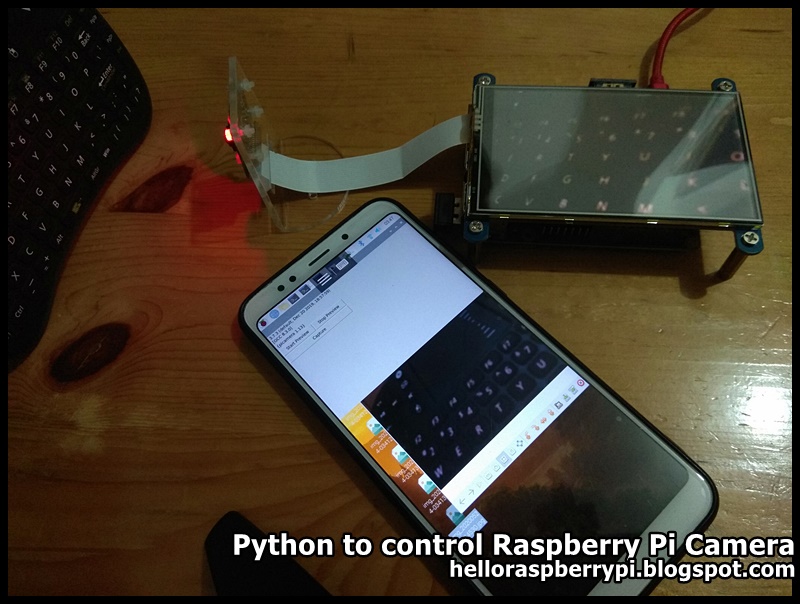
xredp have to be installed in Raspberry Pi, with command:
$ sudo apt-get install xrdp
This video show how it run on Raspberry Pi 3 with Waveshare 4" HDMI LCD, run it on Android phone with Remote Desktop app. The local mounted display (4" HDMI LCD) is used as viewfinder.
Remark:
If you run the script locally, the preview will cover the GUI, but you can still click on it. Click the original position of the Stop Preview button to close the preview.
NOT WORK on High Quality Camera
Once I received High Quality Camera and tested on it, the script fail when capture continuously. Then I make a simple script to take photos using RPi Camera Module, work on v2.1, but also faile on High Quality Camera with "picamera.exc.PiCameraRuntimeError: No data received from sensor."
What's wrong on the script? or my Raspberry Pi High Quality Camera defected?
Tested on:
- Raspberry Pi 3B+
- Update Raspberry Pi OS
- Python 3.7.3
- picamera 1.13
doCappp.py
import picamera
import time

with picamera.PiCamera() as camera:
    camera.start_preview()
    for i in range(5):
        camera.resolution = (1280, 720)
        time.sleep(1)
        filename = 'imageA%02d.jpg' % i
        camera.capture(filename)
        print('Captured %s' % filename)
    time.sleep(7)

    print("End")
    camera.stop_preview()
    time.sleep(1)
    print("End End")
    camera.close()
    print("End End End")
No comments:
Post a Comment