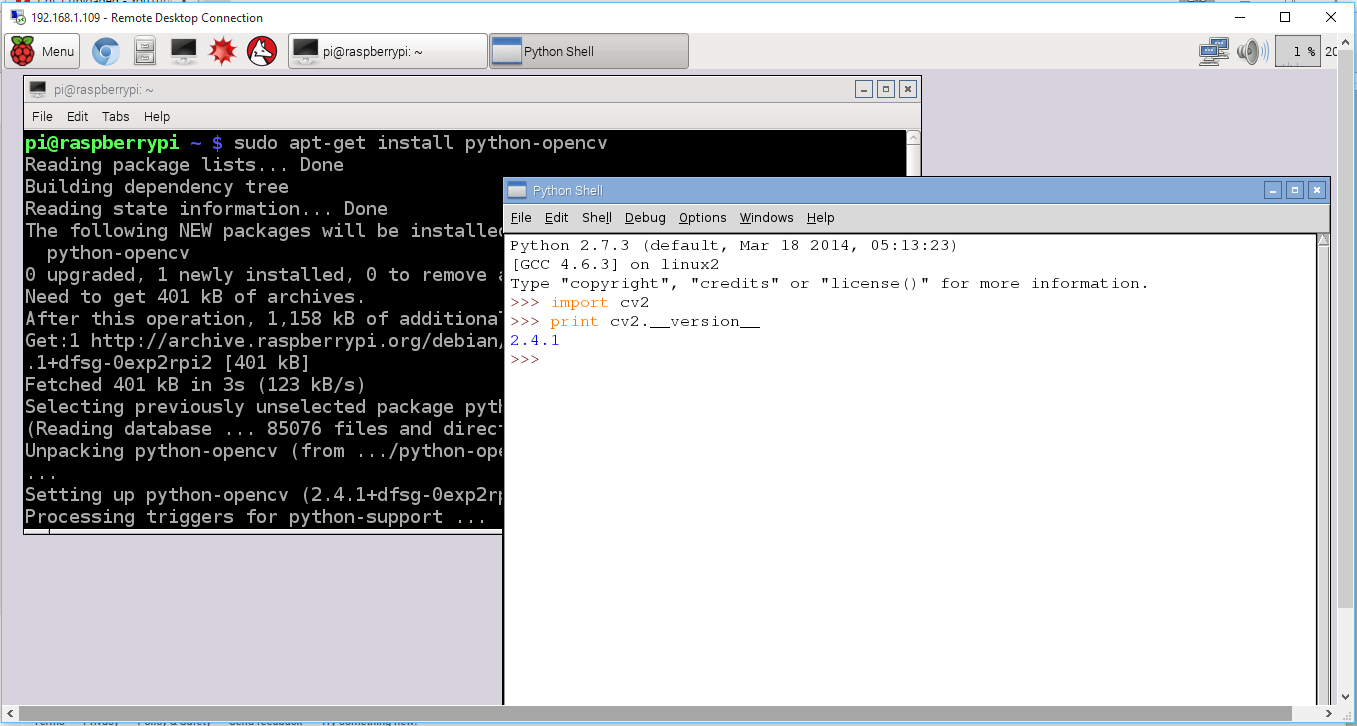
$ sudo apt-get install gphoto2
This video show how to, and also show testing in command line.
If you prefer the latest gPhoto2 2.5.8, you can Compile it with gphoto2-updater script.
 |
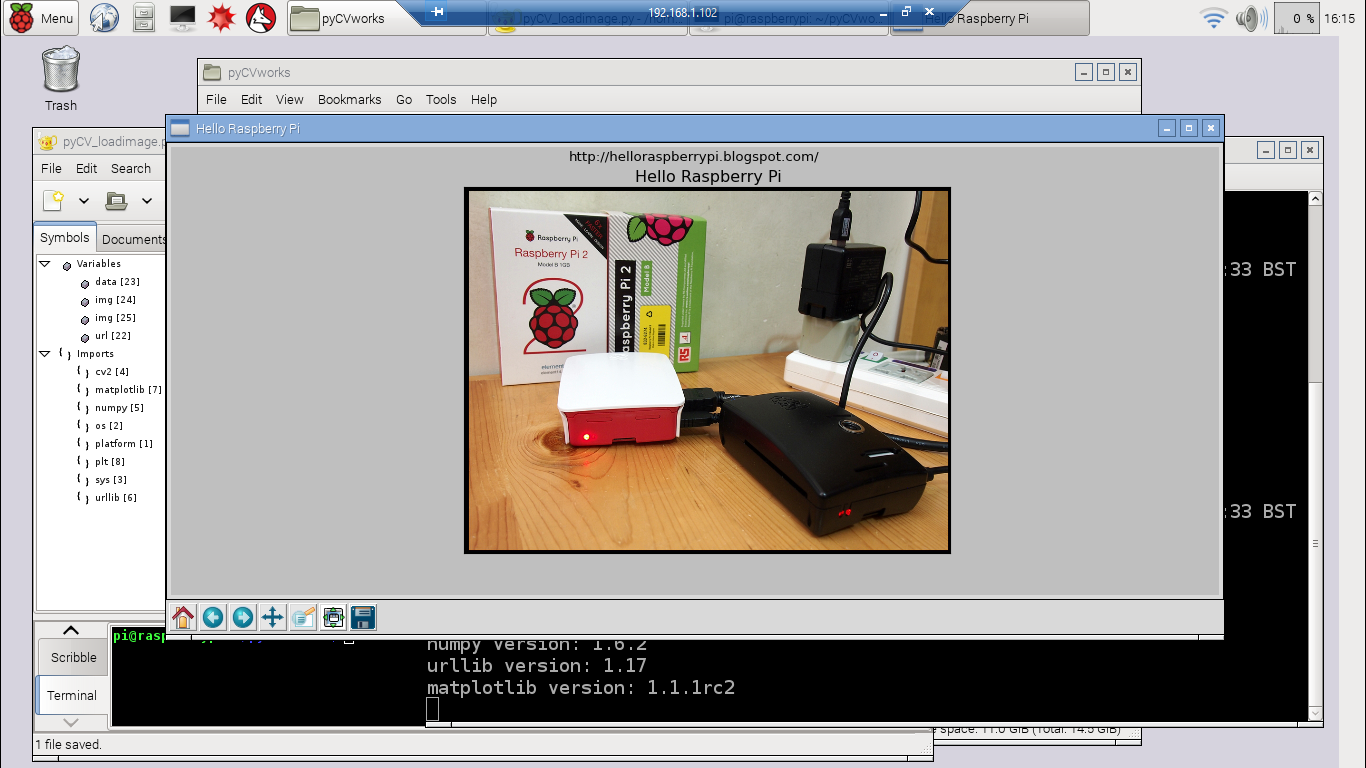
| 1440x900 detected in Raspbian Jessie |
 |
| 640x480 detected in Raspbian Wheezy |


 |
| Raspbian Jessie on Raspberry Pi 1 |
 |
| Raspbian Jessie on Raspberry Pi 1 - remote login using Windows' Remote Desktop Connection and xrdp on Raspberry Pi |


$ wget https://raw.githubusercontent.com/gonzalo/gphoto2-updater/master/gphoto2-updater.sh && chmod +x gphoto2-updater.sh && sudo ./gphoto2-updater.sh


import picamera
import picamera.array
import time
import cv2
from matplotlib import pyplot as plt
import Tkinter
import Image, ImageTk
import sys

def capturePiCam():
    with picamera.PiCamera() as camera:
        cap=picamera.array.PiRGBArray(camera)
        camera.resolution = (640, 480)
        camera.start_preview()
        time.sleep(3)
        camera.capture(cap,format="bgr")
        global img
        img =cap.array

#- display on OpenCV window -
def displayAtOpenCV():
    cv2.namedWindow('imageWindow', cv2.WINDOW_AUTOSIZE)
    cv2.imshow('imageWindow',img)
    cv2.waitKey(0)
    cv2.destroyAllWindows()

#- display with matplotlib -
def displayAtPyplot():
    plt.figure().canvas.set_window_title("Hello Raspberry Pi")
    plt.imshow(cv2.cvtColor(img, cv2.COLOR_BGR2RGB))
    plt.xticks([]), plt.yticks([])  # to hide tick values on X and Y axis
    plt.show()

#- display on Tkinter -
def displayAtThinter():
    root = Tkinter.Tk()
    b,g,r = cv2.split(img)
    img2 = cv2.merge((r,g,b))
    img2FromArray = Image.fromarray(img2)
    imgtk = ImageTk.PhotoImage(image=img2FromArray)
    Tkinter.Label(root, image=imgtk).pack()
    root.mainloop()

def displayUsage():
    print("usage: ")
    print("python pyCV_picam.py 1 - display wiyh OpenCV window")
    print("python pyCV_picam.py 2 - display with matplotlib")
    print("python pyCV_picam.py 3 - display with Tkinter")

if len(sys.argv) != 2:
    displayUsage()
    sys.exit()

opt = sys.argv[1]

if opt=="1":
    print("display wiyh OpenCV window")
    capturePiCam()
    displayAtOpenCV()
elif opt=="2":
    print("display with matplotlib")
    capturePiCam()
    displayAtPyplot()
elif opt=="3":
    print("display with Tkinter")
    capturePiCam()
    displayAtThinter()
else:
    displayUsage()

If you reported with error like this:

gcc -pthread -fno-strict-aliasing -DNDEBUG -g -fwrapv -O2 -Wall -Wstrict-prototypes -fPIC -DHAVE_LIBJPEG -IlibImaging -I/usr/include -I/usr/local/include -I/usr/include/python2.7 -c _imaging.c -o build/temp.linux-armv7l-2.7/_imaging.o

_imaging.c:75:20: fatal error: Python.h: No such file or directory

compilation terminated.

error: command 'gcc' failed with exit status 1
----------------------------------------

Install python-dev:
$ sudo apt-get install python-dev

and re-run the command:
$ sudo pip install PIL

import picamera
import picamera.array
import time
import cv2
from matplotlib import pyplot as plt

with picamera.PiCamera() as camera:
    cap=picamera.array.PiRGBArray(camera)
    camera.resolution = (640, 480)
    camera.start_preview()
    time.sleep(3)
    camera.capture(cap,format="bgr")
    img=cap.array

#- display on OpenCV window -
cv2.namedWindow('imageWindow', cv2.WINDOW_AUTOSIZE)
cv2.imshow('imageWindow',img)
cv2.waitKey(0)
cv2.destroyAllWindows()

#- display with matplotlib
#plt.figure().canvas.set_window_title("Hello Raspberry Pi")
#plt.imshow(cv2.cvtColor(img, cv2.COLOR_BGR2RGB))
#plt.xticks([]), plt.yticks([])  # to hide tick values on X and Y axis
#plt.show()

import platform
import os
import sys
import cv2
import numpy
import urllib
import matplotlib
from matplotlib import pyplot as plt

print platform.system(), platform.release(), platform.dist()
print os.uname()
print("Python version: \n" + sys.version)
print("cv2 version: " + cv2.__version__)
print("numpy version: " + numpy.__version__)
print("urllib version: " + urllib.__version__)
print("matplotlib version: " + matplotlib.__version__)

#- load image from local file
#img = cv2.imread('test.png', cv2.IMREAD_UNCHANGED)

#- load image from internet
url = 'http://goo.gl/41cgQr'
data = urllib.urlopen(url)
img = numpy.asarray(bytearray(data.read()), dtype='uint8')
img = cv2.imdecode(img, cv2.IMREAD_COLOR)

#draw something
#ref:
#http://docs.opencv.org/master/dc/da5/tutorial_py_drawing_functions.html
cv2.line(img,(0,0),(511,511),(255,0,0),5)
cv2.rectangle(img,(384,0),(510,128),(0,255,0),3)
cv2.circle(img,(447,63), 63, (0,0,255), -1)
cv2.ellipse(img,(256,256),(100,50),0,0,180,255,-1)
pts = numpy.array([[10,5],[20,30],[70,20],[50,10]], numpy.int32)
pts = pts.reshape((-1,1,2))
cv2.polylines(img,[pts],True,(0,255,255))
font = cv2.FONT_HERSHEY_SIMPLEX
# AttributeError: 'module' object has no attribute 'LINE_AA'
# to solve it, change 'LINE_AA' to 'CV_AA'
#cv2.putText(img,'OpenCV',(10,500), font, 4,(255,255,255),2,cv2.LINE_AA)
cv2.putText(img,'OpenCV',(10,500), font, 4,(255,255,255),2,cv2.CV_AA)

#- display on OpenCV window -
#cv2.namedWindow('imageWindow', cv2.WINDOW_AUTOSIZE)
#cv2.imshow('imageWindow', img)
#cv2.waitKey(0)
#cv2.destroyWindow('imageWindow')

#sys.exit()

#- display with matplotlib
#set window title of matplotlib plt
plt.figure().canvas.set_window_title("Hello Raspberry Pi")
#-- incorrect color
#plt.imshow(img, cmap = 'gray', interpolation = 'bicubic')
#-- correct color with cv2.cvtColor()
plt.imshow(cv2.cvtColor(img, cv2.COLOR_BGR2RGB))
plt.xticks([]), plt.yticks([])  # to hide tick values on X and Y axis
plt.title("Hello Raspberry Pi")
plt.suptitle("http://helloraspberrypi.blogspot.com/")

plt.show()
import sys
import os
import RPi.GPIO as GPIO
import time

print("**********************************************")
print("*** Toggle PWR/ACT LED on Raspberry Pi 2 B ***")
print("***        for Raspberry Pi 2 B only       ***")
print("**********************************************")
print("- System info -")
print(sys.version)
print("GPIO.VERSION: " + GPIO.VERSION)
print("GPIO.RPI_REVISION (deprecated): " + str(GPIO.RPI_REVISION))

print("")
print("GPIO.RPI_INFO:")
print(GPIO.RPI_INFO)

print("")
for keys,values in GPIO.RPI_INFO.items():
 print(keys + " : " + str(values))

print("")
#display trigger for led0 and led1
print("- Original trigger for led 0 -")
os.system("cat /sys/class/leds/led0/trigger")
print("- Original trigger for led 1 -")
os.system("cat /sys/class/leds/led1/trigger")

print("remove the trigger for led0 and led1")
os.system("echo none >/sys/class/leds/led0/trigger")
os.system("echo none >/sys/class/leds/led1/trigger")
os.system("cat /sys/class/leds/led0/trigger")
os.system("cat /sys/class/leds/led1/trigger")
print("")

GPIO.setwarnings(False)
GPIO.setmode(GPIO.BCM)
GPIO.setup(35, GPIO.OUT) #Red PWR LED on RPi2B
GPIO.setup(47, GPIO.OUT) #Green Activity LED on RPi2B

for num in range(1, 5):
    print num

    #Control led0 with RPi.GPIO
    GPIO.output(47, False)  #Turn OFF ACT LED for RPi 2 B
    GPIO.output(35, True) #Turn ON PWR LED for RPi 2 B
    print "LED PWR(RED)-ON ACT(GREEN)-OFF"
    time.sleep(2)

    #Control led1 with system's shell
    os.system("echo 1 >/sys/class/leds/led0/brightness")
    os.system("echo 0 >/sys/class/leds/led1/brightness")
    print "LED PWR(RED)-OFF ACT(GREEN)-ON"
    time.sleep(3)

print("")
print("Finished")
#rsume the trigger for led0 and
#assume it's mmc0 and input
os.system("echo mmc0 >/sys/class/leds/led0/trigger")
os.system("echo input >/sys/class/leds/led1/trigger")

print("- Resummed trigger for led 0 -")
os.system("cat /sys/class/leds/led0/trigger")
print("- Resummed trigger for led 1 -")
os.system("cat /sys/class/leds/led1/trigger")
print("")
import sys
import RPi.GPIO as GPIO
import time

print(sys.version)
print("GPIO.VERSION: " + GPIO.VERSION)
print("GPIO.RPI_REVISION (deprecated): " + str(GPIO.RPI_REVISION))

print("")
print("GPIO.RPI_INFO:")
print(GPIO.RPI_INFO)

print("")
for keys,values in GPIO.RPI_INFO.items():
 print(keys + " : " + str(values))

GPIO.setwarnings(False)
GPIO.setmode(GPIO.BCM)
#GPIO.setup(16, GPIO.OUT)
GPIO.setup(47, GPIO.OUT)

for num in range(1, 5):
    print num
    #GPIO.output(16, True)   ##Turn OFF LED
    GPIO.output(47, False)   ##Turn OFF LED for RPi 2 B
    print "LED OFF"
    time.sleep(2)
    #GPIO.output(16, False) ##Turn ON LED
    GPIO.output(47, True)   ##Turn ON LED for RPi 2 B
    print "LED ON"
    time.sleep(3)

#GPIO.output(16, True)   ##Turn OFF LED
GPIO.output(47, False)   ##Turn OFF LED for RPi 2 B

import platform
import os
import sys
import cv2
import numpy
import urllib
import matplotlib
from matplotlib import pyplot as plt

print platform.system(), platform.release(), platform.dist()
print os.uname()
print("Python version: \n" + sys.version)
print("cv2 version: " + cv2.__version__)
print("numpy version: " + numpy.__version__)
print("urllib version: " + urllib.__version__)
print("matplotlib version: " + matplotlib.__version__)

#- load image from local file
#img = cv2.imread('test.png', cv2.IMREAD_UNCHANGED)

#- load image from internet
url = 'http://goo.gl/41cgQr'
data = urllib.urlopen(url)
img = numpy.asarray(bytearray(data.read()), dtype='uint8')
img = cv2.imdecode(img, cv2.IMREAD_COLOR)

#- display on OpenCV window -
#cv2.namedWindow('imageWindow', cv2.WINDOW_AUTOSIZE)
#cv2.imshow('imageWindow', img)
#cv2.waitKey(0)
#cv2.destroyWindow('imageWindow')

#- display with matplotlib
#set window title of matplotlib plt
plt.figure().canvas.set_window_title("Hello Raspberry Pi")
#-- incorrect color
#plt.imshow(img, cmap = 'gray', interpolation = 'bicubic')
#-- correct color with cv2.cvtColor()
plt.imshow(cv2.cvtColor(img, cv2.COLOR_BGR2RGB))
plt.xticks([]), plt.yticks([])  # to hide tick values on X and Y axis
plt.title("Hello Raspberry Pi")
plt.suptitle("http://helloraspberrypi.blogspot.com/")

plt.show()
cv2.namedWindow('imageWindow', cv2.WINDOW_AUTOSIZE)

import sys
import cv2
import numpy
import urllib

print("Python version: \n" + sys.version)
print("cv2 version: " + cv2.__version__)
print("numpy version: " + numpy.__version__)
print("urllib version: " + urllib.__version__)

url = 'http://goo.gl/41cgQr'
data = urllib.urlopen(url)
img = numpy.asarray(bytearray(data.read()), dtype='uint8')
img = cv2.imdecode(img, cv2.IMREAD_COLOR)
cv2.namedWindow('imageWindow', cv2.WINDOW_AUTOSIZE)
cv2.imshow('imageWindow', img)
cv2.waitKey(0)
cv2.destroyWindow('imageWindow')

import sys
import cv2
import numpy
import urllib

print("Python version: \n" + sys.version)
print("cv2 version: " + cv2.__version__)
print("numpy version: " + numpy.__version__)
print("urllib version: " + urllib.__version__)

url = 'http://goo.gl/41cgQr'
data = urllib.urlopen(url)
img = numpy.asarray(bytearray(data.read()), dtype='uint8')
img = cv2.imdecode(img, cv2.IMREAD_COLOR)
cv2.imshow('image',img)
cv2.waitKey(0)
cv2.destroyWindow('image')


import sys
import cv2

print("Python version: \n" + sys.version)
print("cv2 version: " + cv2.__version__)

img = cv2.imread('smallRPi.JPG', cv2.IMREAD_UNCHANGED)
cv2.imshow('image',img)
cv2.waitKey(0)
cv2.destroyWindow('image')


package javaipscanner;
import java.io.IOException;
import java.net.InetAddress;
import java.net.UnknownHostException;
import java.util.logging.Level;
import java.util.logging.Logger;
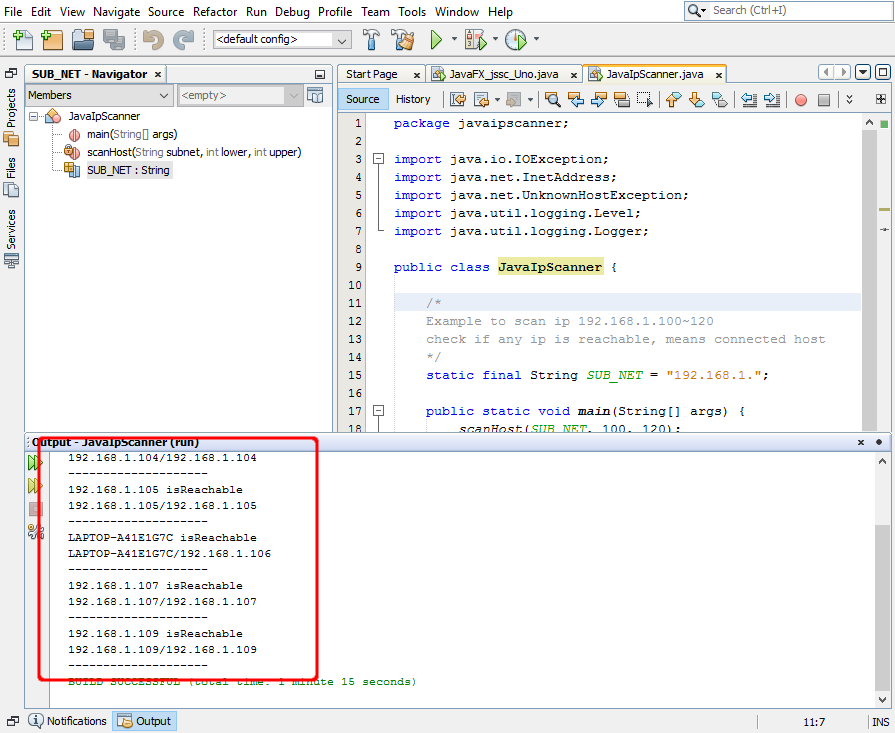
public class JavaIpScanner {
/*
Example to scan ip 192.168.1.100~120
check if any ip is reachable, means connected host
*/
static final String SUB_NET = "192.168.1.";
public static void main(String[] args) {
scanHost(SUB_NET, 100, 120);
}
private static void scanHost(String subnet, int lower, int upper) {
final int timeout = 3000;
for (int i = lower; i <= upper; i++) {
String host = subnet + i;
try {
InetAddress inetAddress = InetAddress.getByName(host);
if (inetAddress.isReachable(timeout)){
System.out.println(inetAddress.getHostName()
+ " isReachable");
System.out.println(inetAddress.toString());
System.out.println("--------------------");
}
} catch (UnknownHostException ex) {
Logger.getLogger(JavaIpScanner.class.getName())
.log(Level.SEVERE, null, ex);
} catch (IOException ex) {
Logger.getLogger(JavaIpScanner.class.getName())
.log(Level.SEVERE, null, ex);
}
}
}
}
 |
| Advanced IP Scanner run on Windows 10 to find IP of Raspberry Pi |
package javaapplication14;

import java.util.Enumeration;
import java.util.Properties;

public class JavaApplication14 {

    public static void main(String[] args) {

        System.out.println("\nSystem Properties\n");
        System.out.println("=================\n");

        Properties properties = System.getProperties();
        System.out.println(properties.toString());
        System.out.println("\n");

        Enumeration<String> prop
                = (Enumeration<String>) properties.propertyNames();

        while (prop.hasMoreElements()) {
            String propName = prop.nextElement();
            System.out.println(
                    propName + " : "
                    + System.getProperty(propName));
        }
    }

}