Saturday, November 30, 2013

Display file system information with Linux df command

The linux command df show information about the file system.
$ df -h

With option / display file system in /dev/root only.
$ df -h /

df command
Display file system information with df command
Related:
Read file system information with Python

Run simple http server on Raspberry Pi with Python

With Python pre-installed on Raspberry Pi, it's really easy to start a simple http server by enter the command:
python -m SimpleHTTPServer

Your http server will be started in port 8000 by default. Then you can visit your server by enter <Raspberry Pi IP>:port in your browser.


If you have a index.html in your current directory, it will be opened as web page. Otherwise, the files in the current directory will be listed in browser.


If you want to specify the port (8080 as example), enter the command:
python -m SimpleHTTPServer 8080


Install Node.js on Raspberry Pi

Visit http://elinux.org/RPi_applications, you can find a Additional deb packages of node.js (http://node-arm.herokuapp.com/node_latest_armhf.deb). To install deb package of node.js on Raspberry, enter the commands in Terminal:

$ wget http://node-arm.herokuapp.com/node_latest_armhf.deb
$ sudo dpkg -i node_latest_armhf.deb

Verify the installation and check the version:

$ node --help
$ node -v

Node.js on Raspberry Pi


Related: "Hello World" Node.js on Raspberry Pi

Display system and memory info of Raspberry Pi with PHP

The former post describe how to "Install LAMP web server on Raspberry Pi". We can create a PHP page (/var/www/testphp.php) to display system and memory info of Raspberry Pi on our web page.

<?php
list($system, $host, $kernel) = split(" ", exec("uname -a"), 5);

$meminfo = file("/proc/meminfo");
$infodetails = "<b>memory info</b><br/>";
for ($i = 0; $i < count($meminfo); $i++) {
 list($item, $data) = split(":", $meminfo[$i], 2);
 $item = chop($item);
 $data = chop($data);
 
 $infodetails .= $i." : ".$item." = ".$data."<br/>";
}
?>
<html>
<head>
<title>Hello Raspberry Pi</title>
</head>
<body>
<ul>
<li><?php echo $system ?></li>
<li><?php echo $host ?></li>
<li><?php echo $kernel ?></li>
</ul>
<?php echo $infodetails; ?><br/>
</body>
</html>

Display system and memory info of Raspberry Pi with PHP

Get memory info with /proc/meminfo

Enter the command in Terminal:
cat /proc/meminfo

Wednesday, November 27, 2013

Use your Android device as wireless mouse and keyboard for your Pi

Simple Computer Remote is the a Android remote app that supports Windows, Linux, Mac OS X, and even the Raspberry Pi. Simple Computer Remote is a wireless touchpad style mouse and keyboard for your desktop computer that works over wifi. This allows you to replace or supplement your mouse and keyboard for control of your media center computer, desktop computer, laptop, raspberry pi, or any other Windows, Linux, or Apple Mac OS X based desktop computer.

Simple Computer Remote is now open source!

DOWNLOAD SERVER
http://philproctor.github.io/SimpleComputerRemote/

FEATURES
* Open Source!
* Zero Configuration
* Touchpad style mouse control
* Use your normal Android keyboard
* Use Swype or voice recognition if your device supports it
* Configurable mouse sensitivity
* No IP Address configuration, works well with dynamic IP
* Landscape or portrait touchpad
* Excellent for presentation or media center control
* Two-finger scrolling
* Push and hold to drag
* Two-finger tap for right click

Raspberry Pi in RED - Red Pi made in China

Do you know there are some Raspberry Pi in RED? It's official licensed in China, Hong Kong, Macau and Taiwan.
Red Pi

The Raspberry Pi is manufactured through licensed manufacturing deals with Newark element14 (Premier Farnell), RS Components and Egoman. Egoman are aiming to make these Pis widely available in China, Hong Kong, Macau and Taiwan., which can be distinguished from other Pis by their red coloring. Because they do not carry FCC/CE marks (although they are fully compatible with the boards you can buy elsewhere), it’s not legal to import them into the EU or the USA, or into some other parts of the world.

source:
- http://www.raspberrypi.org/archives/3195

From EGOMAN website: Raspberry Pi树莓

Raspberry Pi树莓派正式进入中国
为了进一步在大中华区推广树莓派(Raspberry Pi),深圳市韵动电子有限公司向Raspberry Pi基金会申请成为第三家一级代理,并已签署协议获得授权。基金会特别对大中华区销售的产品规范如下:
1、不得改动任何线路、材料。
2、大中华区销售(中国大陆、港、澳和台)。
3、为了和国外的产品区分,PCB必须印刷成红色。
4、必须去掉CE和FCC标志。
同时,Raspberry P基金会官方网站已发布授权通告(www.raspberrypi.org/archives/3195)。

Monday, November 25, 2013

SSH log-in Raspberry Pi emulator for Windows

To login Raspberry Pi emulator for Windows from ssh, you have to forward a port of host to the port 22 of emulator by adding option "-redir tcp:2222::22" in run.bat. Then you can ssh login Raspberry Pi Emulator via the 2222 port of your host ip (not emulator ip).

- Edit <unzipped directory>\qemu\qemu\run.bat

- add the option "-redir tcp:2222::22"

- Login SSH using <your host ip>:2222


Raspberry Pi emulator for Windows

Raspberry Pi emulation for Windows contains everything needed to quickly and simply emulate the Raspberry Pi in a Windows environment. Visit http://sourceforge.net/projects/rpiqemuwindows/, download, un-zip and run.

Raspberry Pi emulation for Windows


Remark@2017-05-07:
PIXEL FOR PC AND MAC released
Try RASPBIAN JESSIE WITH PIXEL on x86 PC using VirtualBox/Windows 10

Saturday, November 23, 2013

Control the on-board LED using C language

Last post show how to control Raspberry Pi on-board LED OK or ACT in command line. This post show the code to control the LED using C language, it have the same result of the exercise using Python.

Control the on-board LED using C language
Control the Raspberry Pi on-board LED using C language
testLED.c
#include <stdio.h>
#include <fcntl.h>
#include <sys/mman.h>
#include <unistd.h>

#define BCM2708_PERI_BASE 0x20000000
#define GPIO_BASE   (BCM2708_PERI_BASE + 0x200000) /* GPIO controller */
#define LED_ACT    16

#define BLOCK_SIZE (4*1024)

int mem_fd;
void *gpio_map;
volatile unsigned *gpio;

// GPIO setup macros. Always use INP_GPIO(x) before using OUT_GPIO(x) or SET_GPIO_ALT(x,y)
#define INP_GPIO(g) *(gpio+((g)/10)) &= ~(7<<(((g)%10)*3))
#define OUT_GPIO(g) *(gpio+((g)/10)) |=  (1<<(((g)%10)*3))
#define SET_GPIO_ALT(g,a) *(gpio+(((g)/10))) |= (((a)<=3?(a)+4:(a)==4?3:2)<<(((g)%10)*3))

#define GPIO_SET *(gpio+7)  // sets   bits which are 1 ignores bits which are 0
#define GPIO_CLR *(gpio+10) // clears bits which are 1 ignores bits which are 0
 
int init_io()
{
 /* open /dev/mem */
 if ((mem_fd = open("/dev/mem", O_RDWR|O_SYNC) ) < 0) {
  printf("can't open /dev/mem \n");
  return(-1);
 }else{
  printf("/dev/mem opened\n");
  
  /* mmap GPIO */
  gpio_map = mmap(
   NULL,             //Any adddress in our space will do
   BLOCK_SIZE,       //Map length
   PROT_READ|PROT_WRITE,// Enable reading & writting to mapped memory
   MAP_SHARED,       //Shared with other processes
   mem_fd,           //File to map
   GPIO_BASE         //Offset to GPIO peripheral 
  );
  
  close(mem_fd);
  printf("/dev/mem closed\n");
  
  if (gpio_map == MAP_FAILED) {
   printf("mmap error %d\n", (int)gpio_map);//errno also set!
   return(-1);
  }else{
   printf("mmap Success.\n");
  }
  
 }
 
 // Always use volatile pointer!
   gpio = (volatile unsigned *)gpio_map;

   return 0;
}


int main(){
 
 if(init_io() == -1) 
 {
  printf("Failed to map the physical GPIO registers into the virtual memory space.\n");
  return -1;
 }
 
 // must use INP_GPIO before we can use OUT_GPIO
 INP_GPIO(LED_ACT); 
    OUT_GPIO(LED_ACT);
 
 int repeat;
 for (repeat=1; repeat<5; repeat++)
 {
  GPIO_SET = 1 << LED_ACT;
  printf("LED OFF\n");
  sleep(2);

  GPIO_CLR = 1 << LED_ACT;
  printf("LED ON\n");
  sleep(1);
 }
 
 printf("- finished -\n");
 return 0;
}


remark:
- You have to login as root to read /dev/mem and control the GPIO. Read the post "Set password of root".
- Disable the LED trigger from mmc0, read the post "Control the on-board LED on Raspberry Pi".

Reference:
- elinux.org: RPi Low-level peripherals

Friday, November 22, 2013

Raspberry Pi Ultimate Starter Kit

Raspberry Pi Ultimate Starter Kit -- Includes Raspberry Pi Board + 11 Essential Accessories
  • Includes Raspberry Pi - Model B (512 MB / Revision 2)
  • Raspberry Pi Enclousure Case (Clear)
  • 4GB SD Card pre-loaded with "NOOB" (Includes Raspbian -- OpenELEC -- Arch -- RaspBMC-- RISC OS -- Pidora)
  • USB Power Supply with Micro USB Cable -- HDMI Cable -- Wireless Wifi Adapter
  • Breadboard - Jumper wires -- USB to TTL Serial Cable -- GPIO Ribbon Cable with Breakout board

Control the on-board LED using Python

Last post show how to control Raspberry Pi on-board LED OK or ACT in command line. This post show the Python code to control it.

Control the on-board LED using Python
Log-in as root, and enter the Python code. It will turn OFF and ON the on-board LED OK or ACT 4 times.

pythonGPIO.py
import RPi.GPIO as GPIO
import time

GPIO.setwarnings(False)
GPIO.setmode(GPIO.BCM)
GPIO.setup(16, GPIO.OUT)

for num in range(1, 5):
    print num
    GPIO.output(16, True)   ##Turn OFF LED
    print "LED OFF"
    time.sleep(2)
    GPIO.output(16, False)   ##Turn ON LED
    print "LED ON"
    time.sleep(1)


Updated:
- Python/RPi.GPIO Control Raspberry Pi 2 B on-board ACT LED
Python control Raspberry Pi 2 PWR/ACT LED, using RPi.GPIO or system's shell


Control the on-board LED on Raspberry Pi

There are 5 on-board LEDs on Raspberry Pi. One of them (marked OK or ACT) can be programmed as GPIO. It's connected GPIO16, usually SD card access indicator.


by default, it is set triggered by mmc0. It can be checked with the command:

# cat /sys/class/leds/led0/trigger
none [mmc0] timer oneshot heartbeat backlight gpio cpu0 default-on

In order to program it as GPIO, remove the trigger with the command:
# echo none >/sys/class/leds/led0/trigger

Then, to turn on the LED, enter the command:
# echo 1 >/sys/class/leds/led0/brightness

Then, to turn off the LED, enter the command:
# echo 0 >/sys/class/leds/led0/brightness

After that, resume the trigger by mmc0 with command (or reboot):
# echo mmc0 >/sys/class/leds/led0/trigger

Control the on-board LED on Raspberry Pi


In my experience, it cannot be perform using sudo, you have to login as root. To login as root, refer to last post "Set password of root".

Related:

Set password of root

By default , there are no password for "root" user in Raspberry Pi(Raspbian). So login as root is disabled. To login as root, you have to assign password to root using the command:

$ sudo passwd root

Set password of root

Show memory usage

Enter the command free to show the memory usage of your Raspberry Pi, or any Linux system. The option -h show in human readable format.

show memory usage
Show memory usage of Raspberry Pi using free -h

Wednesday, November 20, 2013

Install MySQL on Raspberry Pi

To install MySQL on Raspberry Pi, enter the commands:
$ sudo apt-get install mysql-server
$ sudo apt-get install mysql-client
$ sudo apt-get install php5-mysql

Restart Apache2 after installed.
$ sudo service apache2 restart


Tuesday, November 19, 2013

Install PHP5 on Raspberry Pi

To install PHP5 on Raspberry Pi, simple enter the command:
$ sudo apt-get install php5

Display Raspberry Pi system info using php script
The video below also demonstrate how to create a test file to display PHP info, and also retrieve and display Raspberry Pi info with php script.

Install Apache 2 Web Server on Raspberry

Install Apache webserver, enter the command:
$ sudo apt-get install apache2

The /var/www directory is owned by the root by default after installed. It's suggested to change the owner to another group/user, such as www-data. Such that you can easy to modify it, even via ssh remotely.

To change it owned by www-data user and group, enter the command.
$ sudo chown -R www-data:www-data /var/www

To grant permission to www-data group to read/write/execute the directory /var/www.
$ sudo chmod -R 775 /var/www

Add user pi to the group www-data
$ sudo usermod -a -G www-data pi

Log-out/log-in to let the change take effect.

Then you can edit //var/www/index.html by Pi.

Monday, November 18, 2013

Raspberry PI 5MP Camera Board Module

Raspberry PI 5MP Camera Board Module

Product Features

  • Supports 1080p30, 720p60 and 640x480p60/90 video
  • 5 megapixel native resolution sensor-capable of 2592 x 1944 pixel static images
  • Camera is supported in the latest version of Raspbian, Raspberry Pi's preferred operating system

Sunday, November 17, 2013

Change owner and permission of /var/www

Previous post show how to "Install LAMP web server on Raspberry Pi". The /var/www directory is owned by the root by default after installed. It's suggested to change the owner to another group/user, such as www-data. Such that you can easy to modify it, even via ssh remotely.

To change it owned by www-data user and group, enter the command.
$ sudo chown -R www-data:www-data /var/www

To grant permission to www-data group to read/write/execute the directory /var/www.
$ sudo chmod -R 775 /var/www

Add user pi to the group www-data
$ sudo usermod -a -G www-data pi

May be you have to reboot, or log-out/log-in to let the change take effect.
$ sudo reboot

remark: I checked many solution from Internet, almost all provide the first two steps, chown and chmod, without -R option. It make me fail to change the owner and mode!

Then you can login as user pi remotely via ssh, edit the file /var/www/index.html using the build-in graphical edit leafpad.
$ leafpad /var/www/index.html


Get user info and add user to group

The Linux command id print user and group information for the specified USERNAME, or (when USERNAME omitted) for the current user.
Linux command: id
The command groups print group memberships for each USERNAME or, if no USERNAME is specified, for the current process (which may differ if the groups database has changed).
Linux command: groups
Add user to group:
The example add user pi to group root
$ sudo adduser pi root
add user to group
You can also list users of a group use the command:
$ getent group <group>
or
$ grep ^<group> /etc/group
list users in group

Install LAMP web server on Raspberry Pi

The term "LAMP" refer to the common configuration for webservers which standard for:

  • Linux operating system
  • Apache webserver
  • MySQL database server
  • PHP
Installation:

Install Apache 2 Web Server on Raspberry Pi


Install PHP5 on Raspberry Pi


- Install MySQL on Raspberry Pi


Related post:
- Display system and memory info of Raspberry Pi with PHP

route command, view and manipulate the TCP/IP routing table

The command route is used to view and manipulate the TCP/IP routing table.

route command

Saturday, November 16, 2013

Broadcom BCM2835 - SoC on Raspberry Pi

Broadcom BCM2835 is the system on a chip (SoC) on Raspberry Pi. It is a cost-optimized, full HD, multimedia applications processor for advanced mobile and embedded applications that require the highest levels of multimedia performance. Designed and optimized for power efficiency, BCM2835 uses Broadcom's VideoCore® IV technology to enable applications in media playback, imaging, camcorder, streaming media, graphics and 3D gaming.

Download  BCM2835 ARM Peripherals Manual.

BCM2835 ARM Peripherals Manual

Friday, November 15, 2013

Geany - small and fast Editor/IDE

Geany is a text editor using the GTK2 toolkit with basic features of an integrated development environment. It was developed to provide a small and fast IDE, which has only a few dependencies from other packages. It supports many filetypes and has some nice features. For more details see Here.

To install Geany on Raspberry Pi, enter the command:
$ sudo apt-get install geany

Once installed, you can run Geany in Start > Programming > Geany
or enter the command:
$ geany

install Geany on Raspberry Pi

Geany run on Raspberry Pi
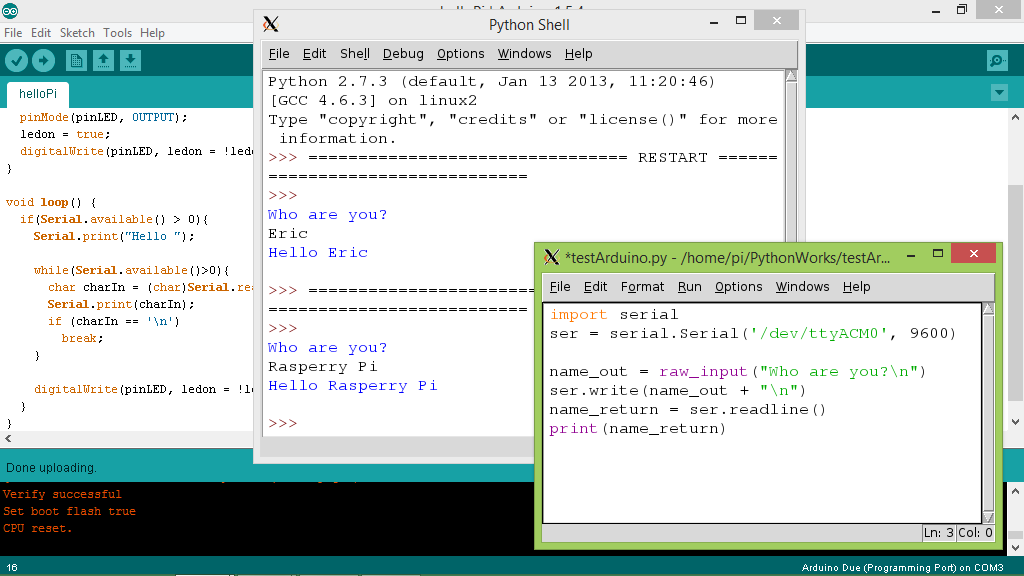
Send and receive from Raspberry Pi to and from Arduino, with Python

This example show how to write a simple Python program on Raspberry Pi to get keyboard input and send to Arduino via USB. In Arduino, send back the received chars to Raspberry Pi, then print on screen in Pi side.


In this example, Raspberry Pi act as host and Arduino Due act as device, and connect with USB on Programming USB Port.

Python code in Raspberry Pi:
import serial
ser = serial.Serial('/dev/ttyACM1', 9600)

name_out = raw_input("Who are you?\n")
ser.write(name_out + "\n")
name_return = ser.readline()
print(name_return)

Code in Arduino side:
int pinLED = 13;
boolean ledon;

void setup() {
  Serial.begin(9600);
  pinMode(pinLED, OUTPUT);
  ledon = true;
  digitalWrite(pinLED, ledon = !ledon);
}
 
void loop() {
  if(Serial.available() > 0){
    Serial.print("Hello ");
    
    while(Serial.available()>0){
      char charIn = (char)Serial.read();
      Serial.print(charIn);
      if (charIn == '\n')
        break;
    }
    
    digitalWrite(pinLED, ledon = !ledon);
  }
}

Cross post with my another blog: Arduino-er

Thursday, November 14, 2013

Hello World using C on Raspberry Pi

The post show how to use the editor nano to create a C's source code of "Hello World", then compile with gcc, and run it. All tools, nano and gcc, are come with Raspbian.

- Create a text file helloworld.c with nano, Ctrl-X to Exit and save the file.
$ nano helloworld.c

- Enter the code:
#include <stdio.h>

int main() {
    printf("Hello World\n");
    return 0;
}

- Compile the code and set output as helloworld
$ gcc -o helloworld helloworld.c

- Run the generated helloworld
$ ./helloworld

The words "Hello World" will be printed.

PyPy 2.2 target Python 2.7.3 announced


This release main highlight is the introduction of the incremental garbage collector, sponsored by the Raspberry Pi Foundation.

This release also contains several bugfixes and performance improvements.

You can download the PyPy 2.2 release here: http://pypy.org/download.html


Wednesday, November 13, 2013

Update Raspberry Pi firmware and software

Check the kernel version with:
$ uname -a

And the GPU firmware with:
$ /opt/vc/bin/vcgencmd version

check kernel and GPU firmware version
To update the firmware can be done with rpi-update. Recent Raspbian releases comes with rpi-update installed.
$ sudo rpi-update

A reboot is needed to activate the new firmware

To update and upgrade latest software list, use the commands:
$ sudo apt-get update
$ sudo apt-get upgrade

updated
reference: http://elinux.org/R-Pi_Troubleshooting

Communication between Raspberry Pi and Arduino via USB, using Python

Last post show how to coding in Arduino Due to send out data to USB. In this post, I will show the code of Python on Raspberry Pi side to receive data from USB, and print it on screen.

In this exercise, Raspberry Pi act as host to support power, and Arduino Due act as device. To connect Arduino board to Raspberry Pi, you need a USB cable. It will be the same cable you use to program Arduino board on PC.

Before we start coding, you need to know the actual device port assigned to Arduino, It should be ttyACMx, x may 0, 1, 2... Refer to the post "Arduino recognized as ttyACMx in Raspberry Pi" to check the port assignment.

In Python, we will use the library of pySerial. Check the post "Install pySerial on Ubuntu" in my another blog, the steps is same in Raspberry Pi.

Start idle, the IDE of Python, in Raspberry Pi. Enter the code in new Python module.

import serial
ser = serial.Serial('/dev/ttyACM0', 9600)

while 1:
    print(ser.readline())


Run Module. It should print the received words, "Hello Pi", on Python Shell window.
data output to Python Shell

Tuesday, November 12, 2013

Prepare Arduino to send data to Raspberry Pi via USB

It's a example to send data from Arduino to Raspberry Pi via USB. In this post, I will show a simple program in Arduino side (tested on Arduino Due), to send something out to USB, and also toggle the on-board LED. In the next post, I will show how to receive in Raspberry Pi Board, from USB, using Python.

The code in Arduino Due to send "Hello Pi" to USB and toggle LED repeatly every second.

int pinLED = 13;
boolean ledon;

void setup() {
  Serial.begin(9600);
  pinMode(pinLED, OUTPUT);
  ledon = true;
}
 
void loop() {
  Serial.print("Hello Pi\n");
  digitalWrite(pinLED, ledon = !ledon);
  delay(1000);
}


The code simple send "Hello Pi" to Serial port (USB) repeatly. After download to your Arduino board, you can use the build-in Tools > Serial Monitor to varify it.

Arduino recognized as ttyACMx in Raspberry Pi

Arduino devices (after UNO) connected to Raspberry Pi, or most Linux,  via USB, will be recognized as ttyACMx. It can be ttyACM0, ttyACM1, ttyACM2...etc.

To check the assigned number (ttyACMx) in Raspberry Pi, or Linux, enter the command after Arduino inserted.
$ dmesg|tail
Arduino Due recognized as ttyACM0 in the example

It can be noticed that ttyACM0 is added under /dev folder.
$ ls /dev/tty*

And more entries added in usb list.
$ lsusb


Monday, November 11, 2013

Programming Hello World with Java on Raspberry Pi

To start program on Raspberry Pi using Java programming, what you need are JDK for Raspberry Pi and a simple text editor such as the build-in LeafPad.

Edit the code with LeafPad, with name of helloPi.java:
class helloPi
{
 public static void main(String srgs[])
 {
  
  System.out.println("Hello Raspberry Pi");
 }
}


Then compile an run it with the command:
$ javac helloPi.java
$ java helloPi

Install Java on Raspberry Pi

If you setup your Raspberry Pi with current New Out Of Box Software(NOOBS) or Raspbian, you should already have Java installed by default.

java and javac on Raspberry Pi
Otherwise, install oracle-java7-jdk by entering the command:

sudo apt-get update && sudo apt-get install oracle-java7-jdk

reference: http://www.raspberrypi.org/archives/4920

related:
Programming Hello World with Java on Raspberry Pi


lsusb: list USB buses and devices connected to Raspberry Pi

lsusb is a Unix/Linux Command to display USB buses and devices connected to system.

Usage: lsusb [options]...
List USB devices
  -v, --verbose
      Increase verbosity (show descriptors)
  -s [[bus]:][devnum]
      Show only devices with specified device and/or
      bus numbers (in decimal)
  -d vendor:[product]
      Show only devices with the specified vendor and
      product ID numbers (in hexadecimal)
  -D device
      Selects which device lsusb will examine
  -t
      Dump the physical USB device hierarchy as a tree
  -V, --version
      Show version of program


Example of using lsusb:
lsusb command
lsusb without and with Arduino device attached

Sunday, November 10, 2013

Login Raspberry Pi's VNC server from Android, with Remote Ripple


Android App Remote Ripple (RFB/VNC Viewer) is a free remote desktop client from the developers of TightVNC. View and control your desktop remotely, in real time, just as if you were sitting in front of remote PC, Mac or Unix system. It’s a VNC viewer so it can connect to any type of VNC server (including built-in screen sharing found in Mac OS X).

It can be used as VNC Viewer on Android devices to login Raspberry Pi remotely. In my test, TightVNC server is running on Raspberry Pi side, the App Remote Ripple run on HTC Flyer (Android 3.2.1).

Remote Ripple run on Android device, login Raspberry Pi
Install Remote Ripple (RFB/VNC Viewer) from Google Play.

- Click New Connection.

- Click More Options.

- Entaer Raspberry Pi's IP address in Host field, and tunnel number(in 590X form) in Port field, then click Connect.

- Enter VNC server Password, and click OK.