In order to take my RPi outdoor to take photos using Camera Module, I prepare a simple Python program to capture image with GUI to easy capture image, with some simple control; such as sharpness, contrast, brightness, saturation and exposure_compensation.
Such that I can login my Pi (with xrdp installed) from mobile phone with GUI and run the Python to take photo.
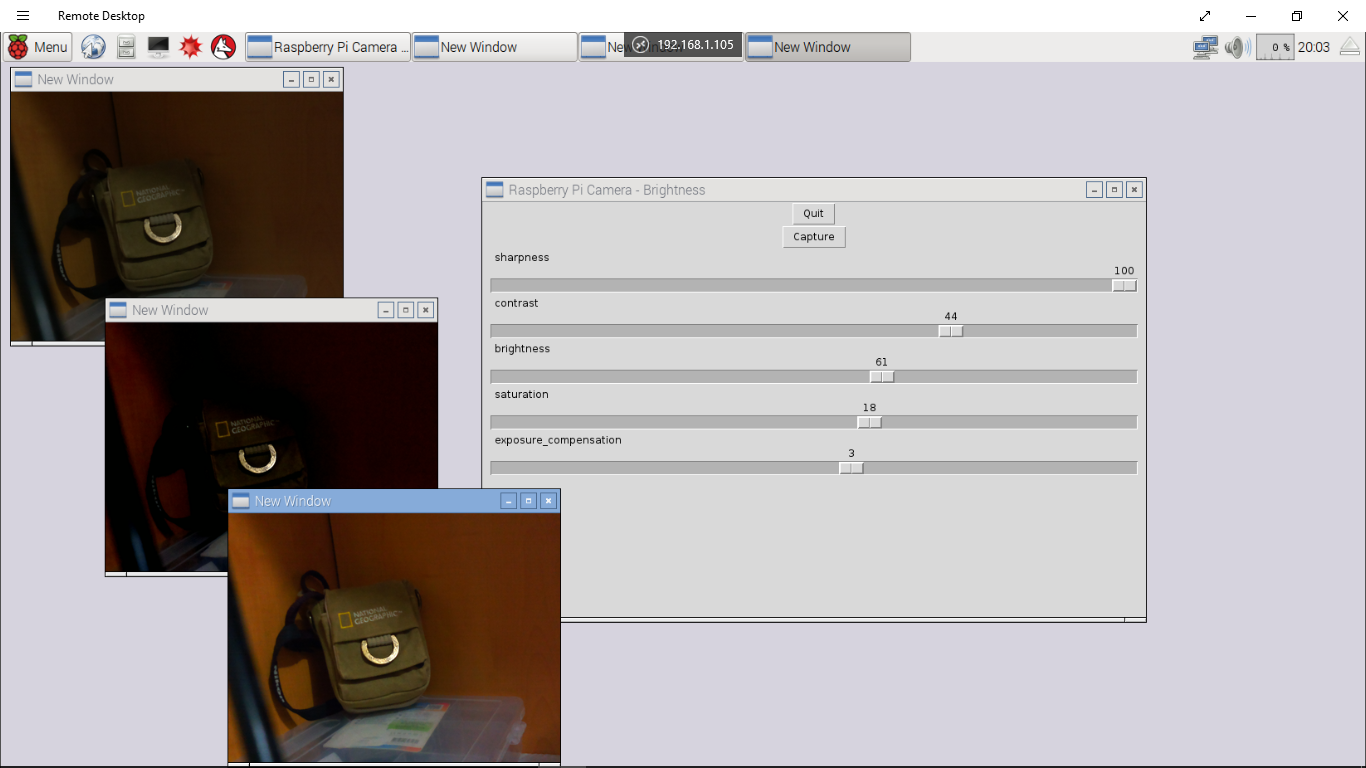
Here how it work:
Program list, myPiCam.py
import picamera
from time import sleep
import Tkinter
import time
from PIL import ImageTk, Image

def quit():
    camera.stop_preview()
    global tkTop
    tkTop.destroy()

def loadJpg(file):

    JpgWin = Tkinter.Toplevel(tkTop)
    JpgWin.title('New Window')
    JpgWin.geometry('400x300')

    image = Image.open(file)
    image = image.resize((400, 300), Image.ANTIALIAS)
    img = ImageTk.PhotoImage(image)
    panel = Tkinter.Label(JpgWin, image=img)
    panel.pack(side = "bottom", fill = "both", expand = "yes")

    JpgWin.mainloop()

def capture():
    #set parameter
    camera.sharpness = scaleSharpness.get()
    camera.contrast = scaleContrast.get()
    camera.brightness = scaleBrightness.get()
    camera.saturation = scaleSaturation.get()
    camera.exposure_compensation = scaleExpCompensation.get()

    timeStamp = time.strftime("%Y%m%d-%H%M%S")
    jpgFile='img_'+timeStamp+'.jpg'
    camera.capture(jpgFile)
    loadJpg(jpgFile)

camera = picamera.PiCamera()

#set default
camera.sharpness = 0
camera.contrast = 0
camera.brightness = 50
camera.saturation = 0
camera.ISO = 0
camera.video_stabilization = False
camera.exposure_compensation = 0
camera.exposure_mode = 'auto'
camera.meter_mode = 'average'
camera.awb_mode = 'auto'
camera.image_effect = 'none'
camera.color_effects = None
#camera.rotation = 0
camera.rotation = 270
camera.hflip = False
camera.vflip = False
camera.crop = (0.0, 0.0, 1.0, 1.0)
#camera.resolution = (1024, 768)
camera.resolution = (2592, 1944)
#end of set default

camera.start_preview()
camera.brightness = 50

tkTop = Tkinter.Tk()
tkTop.wm_title("Raspberry Pi Camera - Brightness")
tkTop.geometry('800x500')

tkButtonQuit = Tkinter.Button(
    tkTop, text="Quit", command=quit)
tkButtonQuit.pack()

tkButtonCapture = Tkinter.Button(
    tkTop, text="Capture", command=capture)
tkButtonCapture.pack()

SCALE_WIDTH = 780;

scaleSharpness = Tkinter.Scale(
    tkTop,
    from_=-100, to=100,
    length=SCALE_WIDTH,
    orient=Tkinter.HORIZONTAL,
    label="sharpness")
scaleSharpness.set(0)
scaleSharpness.pack(anchor=Tkinter.CENTER)

scaleContrast = Tkinter.Scale(
    tkTop,
    from_=-100, to=100,
    length=SCALE_WIDTH,
    orient=Tkinter.HORIZONTAL,
    label="contrast")
scaleContrast.set(0)
scaleContrast.pack(anchor=Tkinter.CENTER)

scaleBrightness = Tkinter.Scale(
    tkTop,
    from_=0, to=100,
    length=SCALE_WIDTH,
    orient=Tkinter.HORIZONTAL,
    label="brightness")
scaleBrightness.set(50)
scaleBrightness.pack(anchor=Tkinter.CENTER)

scaleSaturation = Tkinter.Scale(
    tkTop,
    from_=-100, to=100,
    length=SCALE_WIDTH,
    orient=Tkinter.HORIZONTAL,
    label="saturation")
scaleSaturation.set(0)
scaleSaturation.pack(anchor=Tkinter.CENTER)

scaleExpCompensation = Tkinter.Scale(
    tkTop,
    from_=-25, to=25,
    length=SCALE_WIDTH,
    orient=Tkinter.HORIZONTAL,
    label="exposure_compensation")
scaleExpCompensation.set(0)
scaleExpCompensation.pack(anchor=Tkinter.CENTER)

Tkinter.mainloop()
If you run on Raspbian Jessie, you need to iinstall python-imaging-tk:
$ sudo apt-get install python-imaging-tk
If you run on Wheezy, you have to "Install PIL (with jpg supported) and ImageTk on Raspberry Pi/Raspbian".
Remark:
This code have to be run in terminal using python:
$ python myPiCam.py
If run in IDLE, it will report following error in next run:
PiCameraMMALError: Camera component couldn't be enabled: Out of resources (other than memory)
No comments:
Post a Comment